Creating funnel optimization experiments
Read time: 6 minutes
Last edited: Oct 07, 2024
Overview
This topic explains how to set up and configure a funnel optimization experiment in LaunchDarkly.
Configuring a funnel optimization experiment requires five steps:
- Creating metrics for your funnel,
- Creating a funnel group,
- Building an experiment,
- Turning on the feature flag, and
- Starting an iteration.
These steps are explained in detail below.
Prerequisites
Before you build an experiment, you should read about and understand the following concepts:
Create metrics
Metrics measure audience behaviors affected by the flags in your experiments. Custom conversion binary metrics and clicked or tapped metrics are most often used with funnel optimization experiments. To learn more, read Choose a metric type.
Funnel experiments can only use metrics that use the "Average" analysis method. You cannot use metrics that use a percentile analysis method in a funnel experiment. To learn more, read Analysis method.
If you want to learn which flag variation performs better, it must be possible for that metric to measure something in all of the flag variations within the experiment. To learn more, read Metrics and flag variations.
Create funnel metric groups
A metric group is a reusable, ordered list of metrics you can use to standardize metrics across multiple experiments. You must create a funnel metric group before you build a funnel optimization experiment. To learn how, read Metric groups.
To create a useful funnel metric group, each metric within the group should represent a mandatory step in the customer journey. Customers should not be able to skip steps in the funnel, or complete steps out of order. If they can, you should instead create a standard metric group to use with a feature change experiment. Or, if you have other metrics you want to measure in addition to an ordered funnel with required steps, you can add them as secondary metrics.
Build experiments
You can view all of the experiments in your environment on the Experiments list.
To build an experiment:
- Navigate to the Experiments list.
- Click Create experiment.
- The "Experiment details" step opens. Enter a Name.
- Enter a Hypothesis.
- Select the Funnel optimization experiment type.
- (Optional) If you want to include the experiment in a holdout, click Advanced, then select a Holdout name.
Experiments can either be in a holdout, or in a layer, but not both. If an experiment is part of a holdout, you will not see the option to add it to a layer when you create it. To learn more, read Mutually exclusive experiments.
- Click Next. The "Choose randomization unit and attributes" step opens.
- Choose a context kind from the Randomization unit menu. If you included the experiment in a holdout, the experiment's randomization unit is automatically set to the holdout's randomization unit.
- (Optional) Choose up to five context attributes to slice results by.
- Click Next. The "Select metrics" step opens.
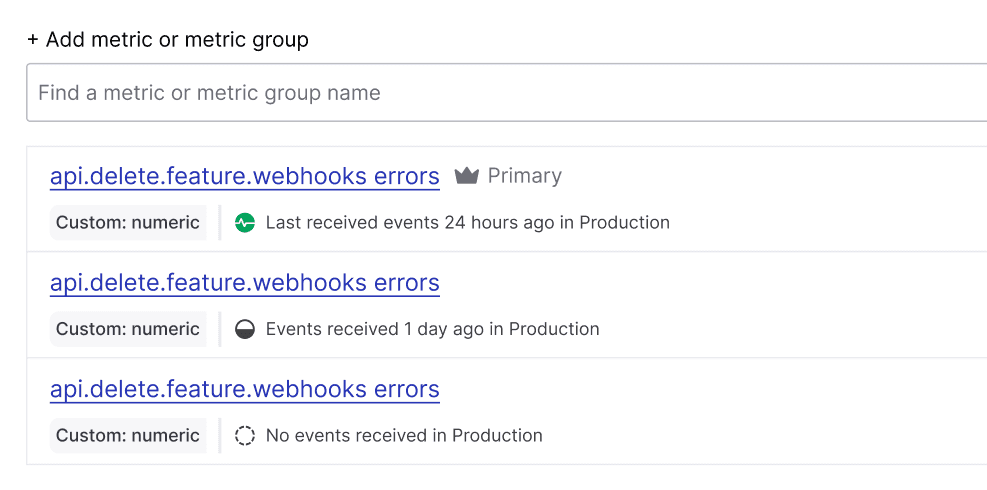
- Choose a funnel group, or click Create to create and use a new funnel group. The metric group you select must use the same randomization unit as the experiment.
- A list of environments displays showing which environments have received events for these metrics. If no environments are receiving events, check that your SDKs are configured correctly.
- (Optional) Choose additional metrics or metric groups from the Secondary metrics menu.
- Click Next. The "Choose flag variations" step opens.
- Choose a Flag to use in the experiment, or click Create flag to create and use a new flag.
- Click Next. The "Set audience" step opens.
- (Optional) Check the Add experiment to layer checkbox if you want to exclude contexts in this experiment from other experiments.
Expand layer options
A layer is a set of experiments that cannot share traffic with each other. All of the experiments within a layer are mutually exclusive, which means that if a context is included in one experiment, LaunchDarkly will exclude it from any other experiments in the same layer. To learn more, read Mutually exclusive experiments.
To add the experiment to a layer:
- Click Select layer to add the experiment to an existing layer.
- Select the layer you want to add the experiment to.
- If you do not have a layer configured or need to create a new layer, click Create layer.
- Add a Name and Description.
- Click Next.
- Add a Reservation amount. This is the percentage of the contexts within this layer you want LaunchDarkly to include in this experiment.
- In the "Define audience" section, choose which targeting rule to run the experiment on.
- If you want to restrict your experiment audience to only contexts with certain attributes, create a targeting rule on the flag you include in the experiment and run the experiment on that rule.
- If you don't want to restrict the audience for your experiment, run the experiment on the flag's default rule. If the flag doesn't have any targeting rules, the flag's default rule will be the only option.

- Enter the percentage of traffic for each variation you want to include in the experiment.
- Select which variation you want LaunchDarkly to serve to the remaining population.
- (Optional) Advanced: For most experiments, we recommend leaving the Advanced options on their default settings. To learn more, read Carryover bias and variation reassignment.
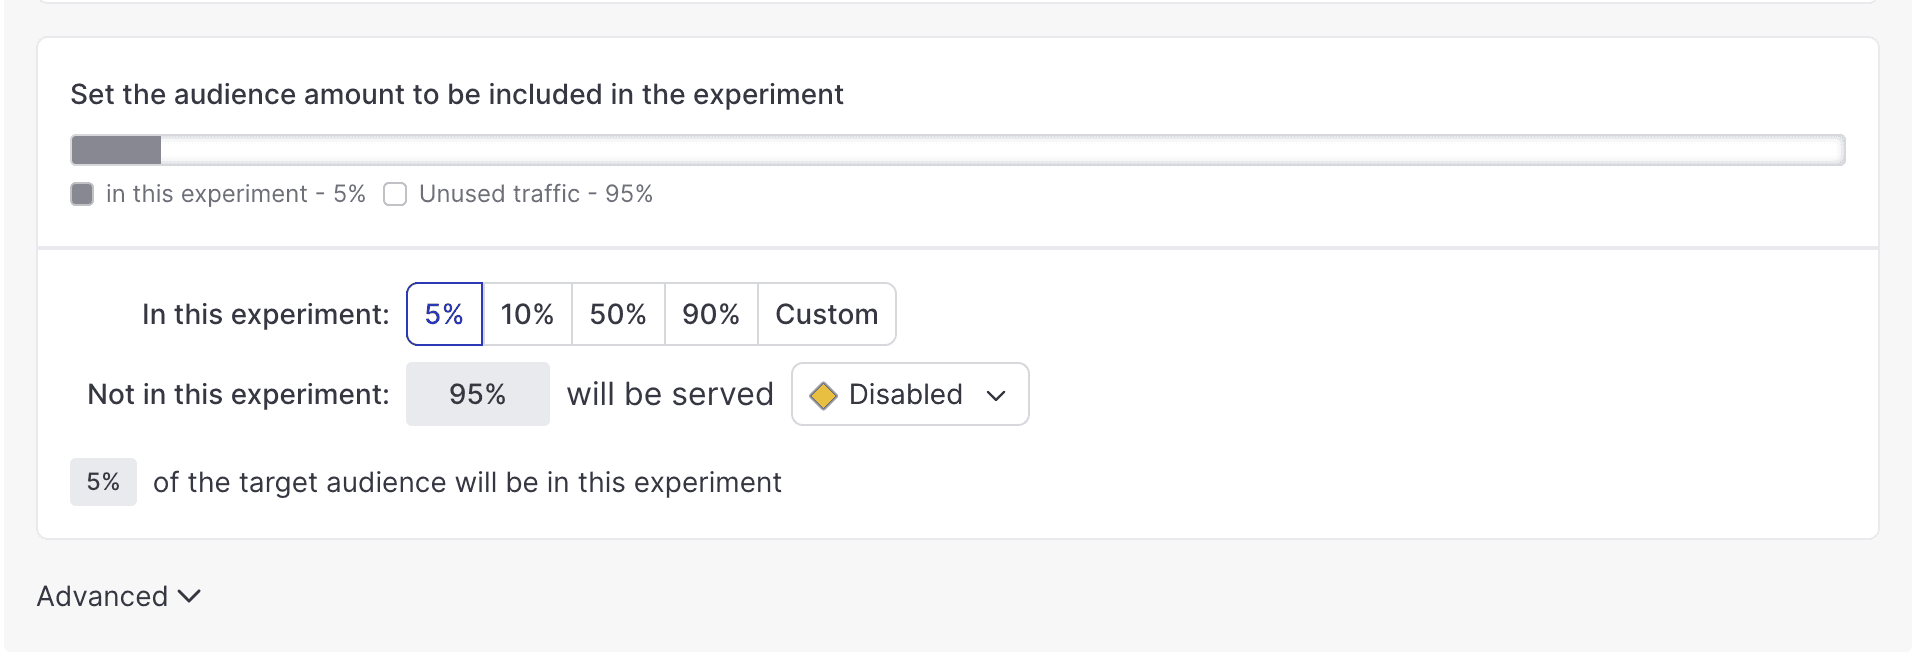
- Choose how you want to split the experiment audience:
- Equally splits the experiment traffic equally between all variations in the experiment.
- Percentage allows you to select specific percentages for each variation.
- Click Finish. You are returned to the experiment's Design tab.
You can also use the REST API: Create experiment
After you have created your experiment, the next steps are to toggle on the flag and start an iteration.
Turn on feature flags
For an experiment to begin recording data, the flag used in the experiment must be on. To learn how, read Turning flags on and off.
You can build multiple experiments on the same flag, but you can run only one of those experiments on the flag at a time.
Start experiment iterations
After you create an experiment and toggle on the flag, you can start an experiment iteration in one or more environments.
To start an experiment iteration:
- Navigate to the Experiments list.
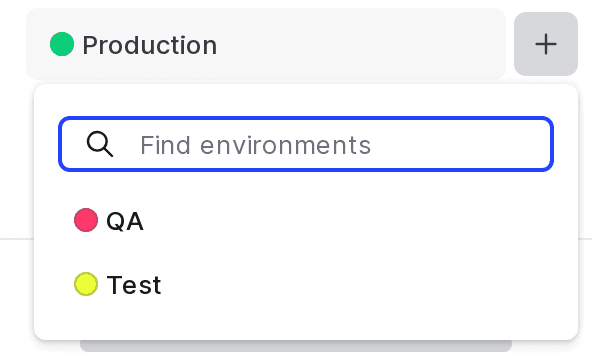
- Click on the environment section containing the experiment you want to start.
- If the environment you need isn't visible, click the + next to the list of environment sections. Search for the environment you want, and select it from the list.
- Click on the name of the experiment you want to start an iteration for. The Design tab appears.
- Click Start.
- Repeat steps 1-4 for each environment you want to start an iteration in.

Experiment iterations allow you to record experiments in individual blocks of time. To ensure accurate experiment results, when you make changes that impact an experiment, LaunchDarkly starts a new iteration of the experiment.
To learn more about starting and stopping experiment iterations, read Managing experiments.
You can also use the REST API: Create iteration