Get started
Read time: 25 minutes
Last edited: Jan 16, 2025
Welcome to LaunchDarkly!
Hello and welcome to LaunchDarkly! We’re excited to meet you. LaunchDarkly serves a suite of tools that help you ship your code safer, faster, and more effectively with whatever language and frameworks you use today.
This guide explains why feature flags are useful and then takes you through steps to accomplish the following:
- Sign up for a free LaunchDarkly trial
- Install a LaunchDarkly software development kit (SDK)
- Create your first feature flag
- Retrieve the value of the feature flag from your code
- Target the feature flag
- Create an audience for that feature flag to target
First, let’s talk about what a feature flag is and why it is useful.
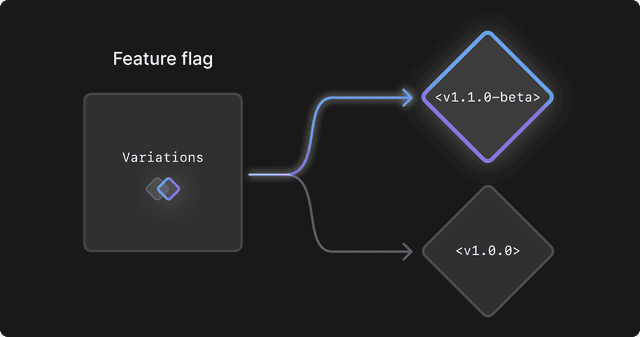
What is a feature flag?
A feature flag is a small piece of code used in software development to enable or disable a feature without modifying your source code or redeploying your app. Feature flags let you reduce the risk of releasing new features by rolling them out progressively across subsets of your users over time. You can enable or disable a feature flag with one click of a toggle in the LaunchDarkly user interface (UI). Turn feature flags on or off for targeted sets of users, which you can identify by context or attribute like email, user type, organization, or any other context you can describe.
How feature flags work
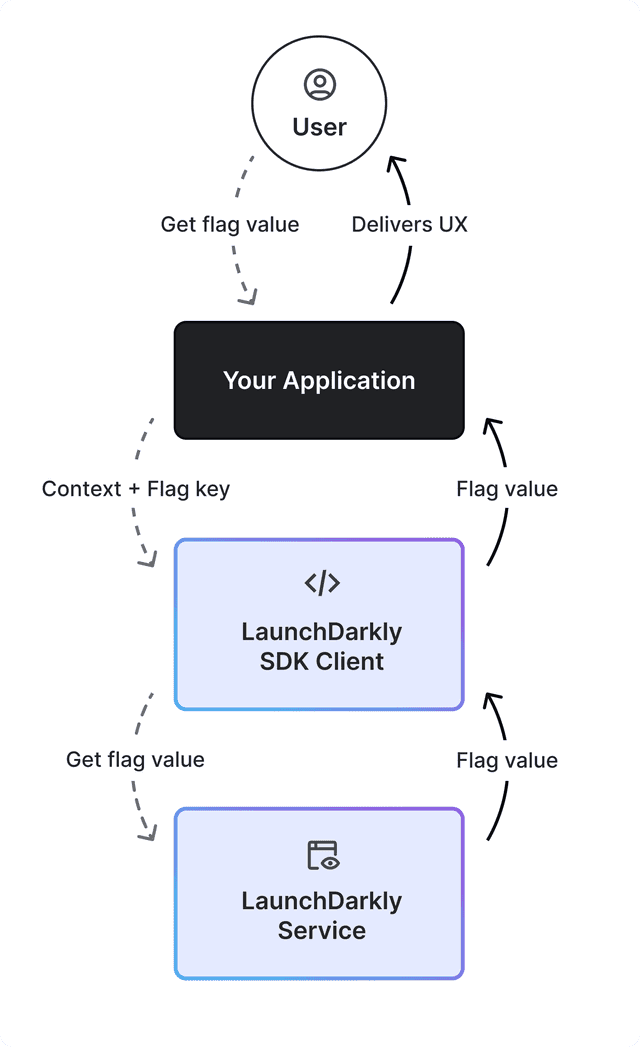
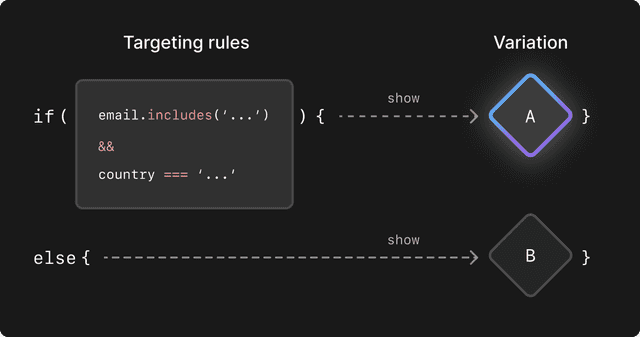
A feature flag is defined in LaunchDarkly through the UI. The feature flag describes different variations of a feature and the targeting rules that specify which end users should receive which variations. Your application provides the context of a user when requesting the value of the feature flag. Using targeting rules, LaunchDarkly returns the value of the feature flag based on the user context your application supplies. Your application can then provide different experiences to each user based on the value of the feature flag.
Here's what that flow looks like:
Why are feature flags useful?
Conditionally releasing software to small, targeted audiences of users reduces risk in your software development cycle, accelerates the pace with which you can deploy new code, and preserves the quality of your users’ app experience. Smaller audiences can surface unanticipated problems with new features quickly while reducing your support load for each new deployment.
Feature flags are necessary for teams that want to ship fast and safely. Using feature flags for a new release enables a single-click rollback, end-to-end testing in production, and targeted exposure of new features to key customers.
Getting excited? Let’s create your first feature flag.
1. Sign up for a free trial
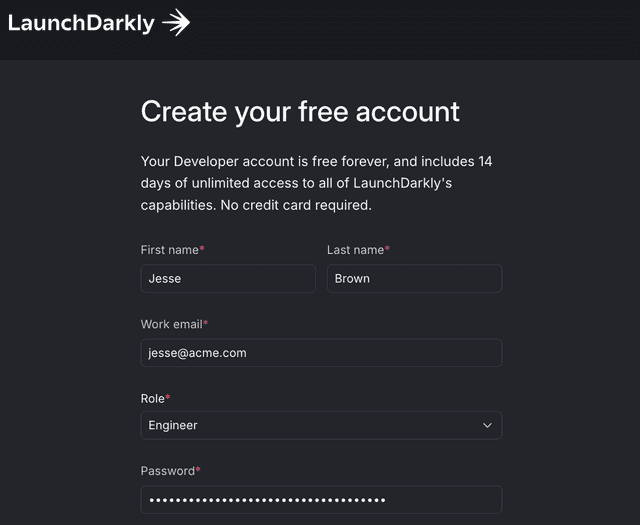
First, let’s create your LaunchDarkly account and start a free trial. Your free trial gives you 14 days to try all of LaunchDarkly’s tools, including the core unit of work in LaunchDarkly: feature flags.
After 14 days have elapsed, your trial automatically converts to a developer tier plan. This plan tier is free up to 1,000 users or contexts per month and 10,000 experiment keys.
Here is a picture of the signup screen:
After you sign up for a trial, you can also use the LaunchDarkly demo sandbox.
2. Install an SDK for your codebase
Next, let’s install a LaunchDarkly SDK in the language or framework that you use today.
Open your command line interface (CLI) and use your package manager of choice to install a LaunchDarkly SDK. The SDK will help you retrieve your first feature flag quickly and easily.
To install, select your package manager and copy and paste the command into your CLI:
To learn more about every LaunchDarkly SDK, read the SDK documentation.
3. Create your first feature flag
Awesome! You're ready to create your first feature flag. In this section, you will:
- Create a feature flag.
- Build your first context.
- Retrieve the value of the feature flag.
- Integrate the feature flag into the demo code.
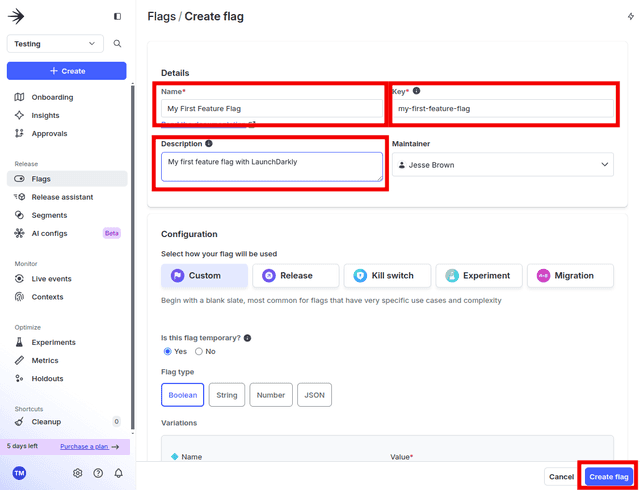
First, navigate to the Flags list in the LaunchDarkly UI. The Flags list is empty because this LaunchDarkly project doesn’t have any feature flags yet. In this section, you will make your first one.
Click Create Flag. The flag create page opens.
In the flag create page, give the flag a name and write a description explaining what it does. The flag key automatically populates based on the name you enter.
After you enter a name and description, click Create flag:
Now, turn on the feature flag by clicking On next to "Enable targeting rules for Test."
Click Review and save to save this setting.
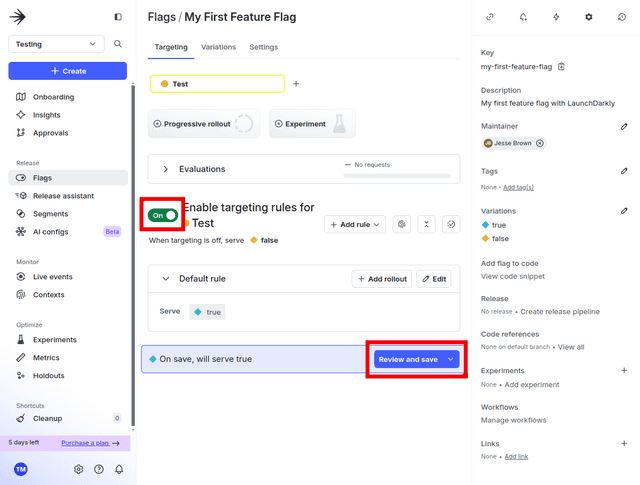
You are prompted to leave a comment explaining your change. Enter a comment for the feature flag change in the Comment field. To save the comment, click Save changes.
Great! Your first feature flag is created and turned on. Now let’s write some code.
4. Retrieve the value of your first feature flag
Initialize your LaunchDarkly client
Return to the software project where you installed the LaunchDarkly SDK. Now you can configure the LaunchDarkly client to your account. After you have authenticated, you can retrieve the feature flag you created in Step 3.
Different credentials are available in LaunchDarkly. Here are their names and how they are used:
- Environment key: a unique string that identifies each environment in your project. By default, your account is configured with "Production" and "Test" environments. This key is not used in the LaunchDarkly SDKs.
- SDK key: this string authorizes a LaunchDarkly client to connect from your server. It is a secret that you should import into your code securely. A common way of doing this is by importing it into your code as an environment variable.
- Mobile key: this string authorizes a LaunchDarkly client in a mobile SDK, like iOS or Android. Mobile keys can be reset, so they do not need to be kept secret.
- Client-side ID: this string authorizes a LaunchDarkly client for client-side and edge SDKs. The client-side ID does not need to be kept secret. Unlike the mobile key, it cannot be reset.
Expand Implementing LaunchDarkly on the server
If you are implementing LaunchDarkly server-side, you must authorize the client with an SDK key.
Import the LaunchDarkly client into the project and pass a configuration with your SDK key. You can find your SDK key in the environments section of your project in the LaunchDarkly UI. Select the Test environment, click the overflow menu to the right marked by the three dots, and then click Copy… SDK Key.
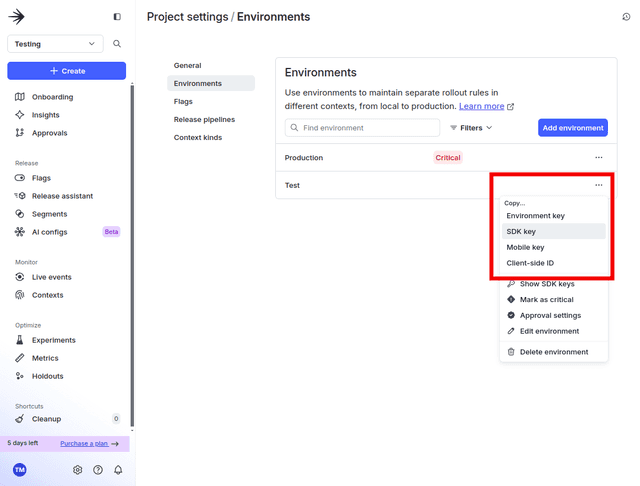
Your SDK key is now in your clipboard.
Expand Implementing LaunchDarkly in the client
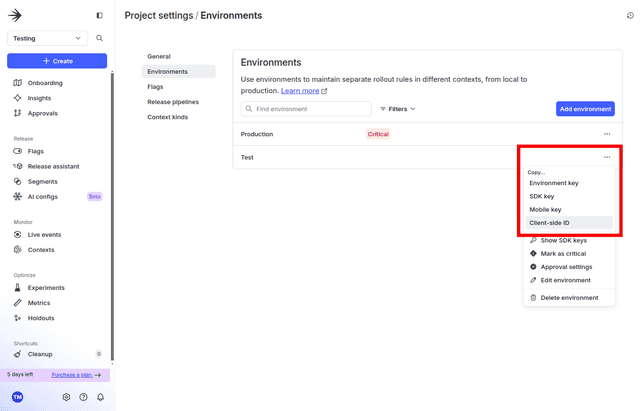
If you are implementing LaunchDarkly client-side, you must authorize the client with a Client-side ID.
Import the LaunchDarkly client into the project and pass a configuration with your client-side ID. You can find your client-side ID by visiting the environments section of your project in the LaunchDarkly UI. Select the Test environment, click the overflow menu to the right marked by the three dots, and then click Copy… SDK Key.
Expand Implementing LaunchDarkly on mobile
If you are implementing LaunchDarkly on mobile, you must authorize the client with a mobile key.
Import the LaunchDarkly client into the project and pass a configuration with your mobile key. You can find your mobile key by visiting the environments section of your project in the console. Select the Test environment, click the overflow menu to the right marked by the three dots, and then click Copy… SDK Key.
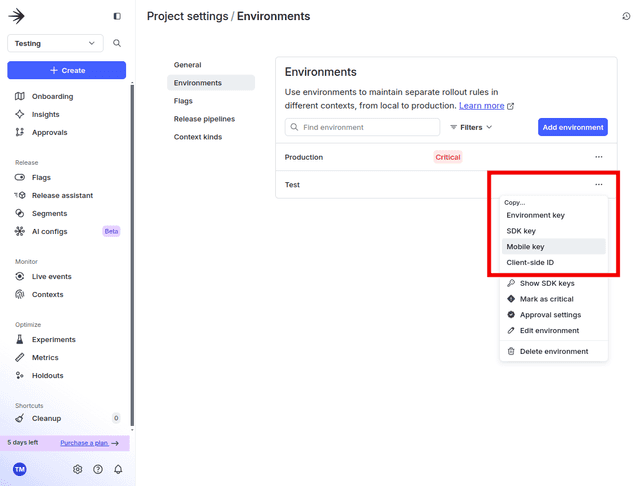
For your convenience, the code samples below use placeholder SDK keys in plaintext. Never use a plaintext SDK key in a public repo or a production environment. Use an environment variable to import SDK keys instead.
Now that you have the appropriate credential, initialize the LaunchDarkly client. Import a few dependencies from the LaunchDarkly SDK you installed earlier. Then initialize the client by passing a Config with the SDK key passed as a string:
Execute the code and observe the output:
LaunchDarkly is successfully authenticated to your account.
If you're having trouble authenticating, make sure you are copying the SDK credential from your Test environment. Credentials from other environments or projects won't work.
Great! Now you can build your first context.
Build your first context
When you use the LaunchDarkly client to retrieve a feature flag, you need to pass LaunchDarkly a context that describes the audience encountering the feature flag. A context can include any attribute of an audience that your app has captured: email address, user type, company or organization, device type, screen size, demography, geography, or any other descriptor you can define. If you need to, you can pass more than one context to LaunchDarkly simultaneously when retrieving a feature flag.
For the purposes of this example, start by defining a context as a user.
Using the code samples below, expand the test code from earlier in this tutorial by creating the first context with a demo user called "Sandy." The code samples define the user’s kind, name, email address, and a demo user ID string.
Perfect! Now that you have authenticated the client and identified the user with a context, you can get the value of your first feature flag.
Retrieving your first feature flag
Now you can retrieve the value of the feature flag. To write this code, return to the feature flag you created earlier and copy the feature flag’s key to your clipboard.
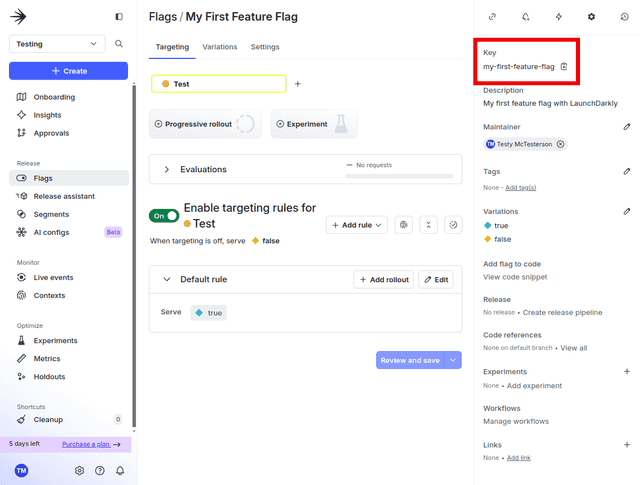
Next, get the value of the feature flag in the code. Pass the LaunchDarkly client the flag key you just copied, the user context you created in the previous step and the flag's fallback value, which you can declare as False:
Now, if you run the code, you will see the value of the flag is True. Let’s see what happens if you turn your feature flag off.
Returning to the flags list in the LaunchDarkly UI, find the feature flag you created, click Off next to "Enable targeting rules for Test," and then click Review and save.
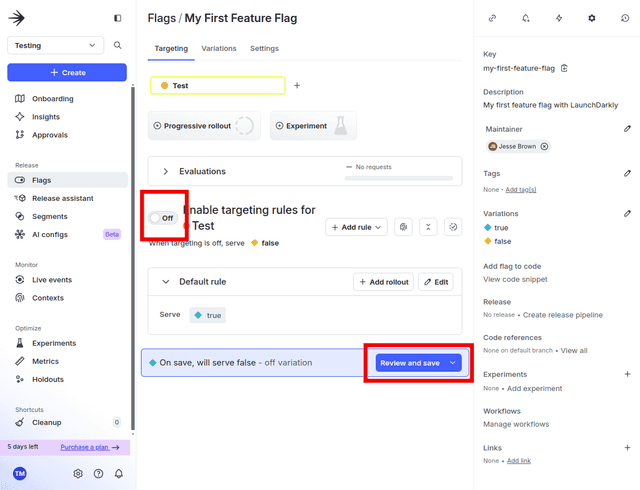
Explain the change in the Comment field and click Save changes.
Finally, execute the code again and see what the feature flag returns:
Our first feature flag is: False
The flag you just turned off now has a value of False.
Next, let’s explore how you can leverage a feature flag’s value in more realistic code.
Integrate your first feature flag
The demo code you created earlier is intended to introduce you to the three important concepts of LaunchDarkly: feature flags, authenticated clients, and contexts. Now we can explore how you can integrate them in a more realistic software project.
Imagine that you have a new template you wish to deploy. Using a feature flag will let you deploy this template to a small subset of users first before rolling it out progressively to the entire user base.
Explore this pseudocode that describes how such an implementation could look in production:
You can imagine implementing your app’s behavior in many different ways depending on what features you want to deploy to your users.
Let’s explore how you would do that by creating an audience.
5. Targeting the audience for your first feature flag
Great! You're ready to target an audience. In this step, you will:
- Create your first audience.
- Add your first targeting rule.
- Confirm your targeting rule works.
Create your first audience
Here is some code to create some more demonstration users you can target with the feature flag.
This code creates three new users: Alice, Bob, and Carlos. Alice and Bob will share the same context kind as Sandy, who you created earlier. Carlos will be a new kind of context you will define as beta-user:
When you execute the code, observe that all three of the contexts receive False from the feature flag.
Alice's flag value is: False
Bob's flag value is: False
Carlos' flag value is: False
Return to the LaunchDarkly UI to target the feature flag on Carlos, the beta tester.
Add your first targeting rule
Return to the feature flag in the LaunchDarkly UI, then set the feature flag to only target contexts with the kind "beta-user."
First, click Add rule in the flag targeting section, then click Build a custom rule:
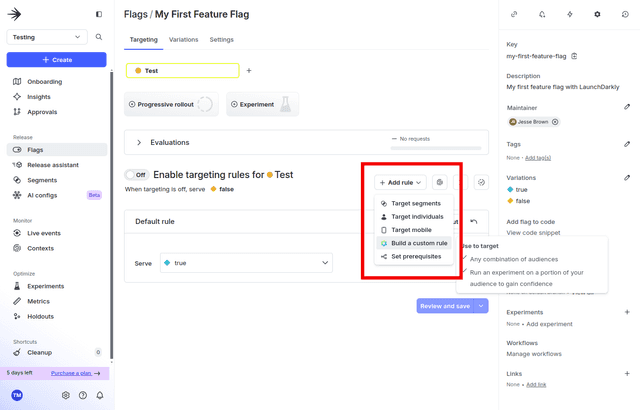
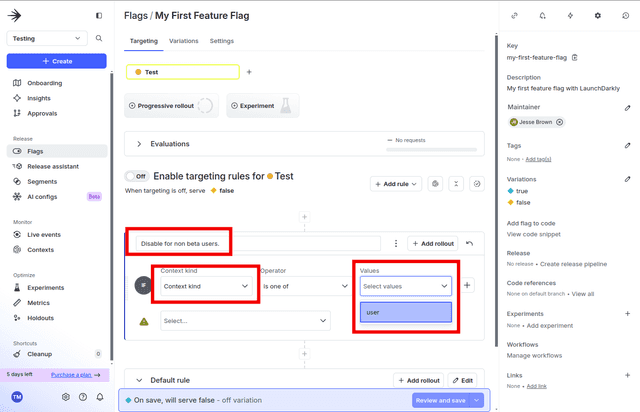
Next, add a rule disabling the flag for all users with kind "user." First, describe the rule by typing an explanation in the Description field. Then switch the Context kind to Context kind. Finally, target all users with the "user" kind by changing the Values to user:
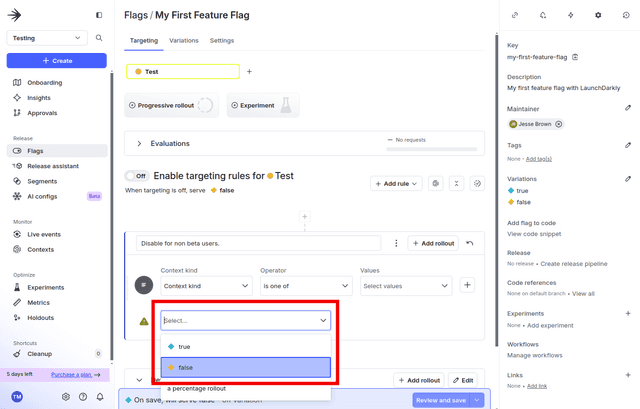
Change the Serve value to false:
Click Review and save. Leave a comment in the Comment text area and click Save changes.
Next, turn on the feature flag and then click Review and save. Then, add another comment and click Save changes.
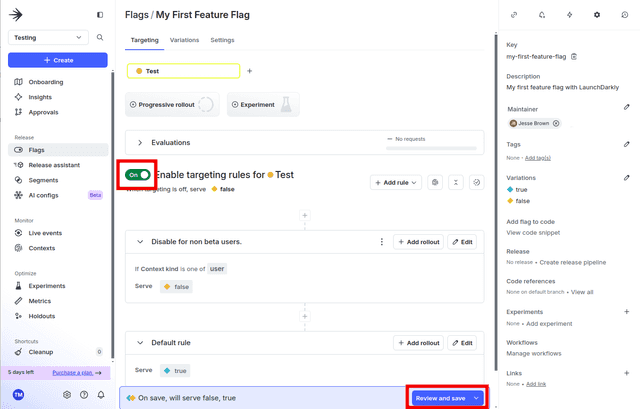
Terrific! Your feature flag now serves False to all contexts with the "user" kind, while contexts with the "beta-tester" kind receive True.
Return to your demo code to see this in action.
Confirm your targeting rule
Return to the code and execute it again.
Alice and Bob now receive False while Carlos, the context with the "beta-tester" kind, receives True:
Alice's flag value is: False
Bob's flag value is: False
Carlos' flag value is: True
Targeting rules can use multiple contexts to build tightly narrowed subsets with extensible flexibility. Imagine targeting only mobile devices, only users with Gmail addresses, or only users in a certain geography. Each of these can be described with multiple contexts, allowing for granular control on who does and does not get the new feature.
By describing your users with a Context and building targeting rules in your feature flags, your new features can target the precise audience you intend.
And with that, you're done!
6. What’s next
Let's review what you accomplished:
With some demonstration code, you installed a LaunchDarkly SDK, created a feature flag, retrieved the value of the flag, explored integrating the feature flag in production, and targeted your first audience of users with your first feature flag.
Congratulations on taking the first steps toward a safer, faster, and more effective methodology for deploying new code with LaunchDarkly. This is only the beginning.
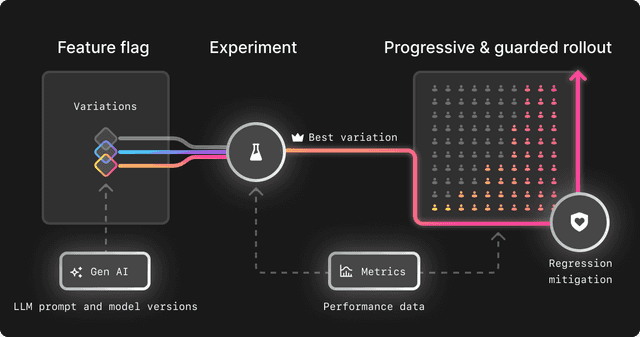
What’s next?
- Learn more about contexts to describe your users and target them with rules
- Learn to create your first experiment to A/B test new features
- Manage your deployment with a release
- Create your first custom metric to measure the effectiveness of your new features
- Debug your integration with your SDK’s API reference
- Take a course in LaunchDarkly Academy