Best practices for upgrading users to contexts
Read time: 13 minutes
Last edited: Oct 02, 2024
Overview
This guide summarizes what contexts are and describes best practices for upgrading your LaunchDarkly account and SDKs from users to contexts.
Contexts are the upgraded version of LaunchDarkly's existing "user" data objects. Previously, flags could only target users, which was limiting if you wanted to target organizations, devices, groups, or other entities. Contexts give you much more targeting flexibility. They let you create targeting rules for feature flags based on a variety of different information, including attributes pertaining to users, organizations, devices, and more. To learn more, read Contexts.
Concepts
Before you use this guide, you should understand the following concepts.
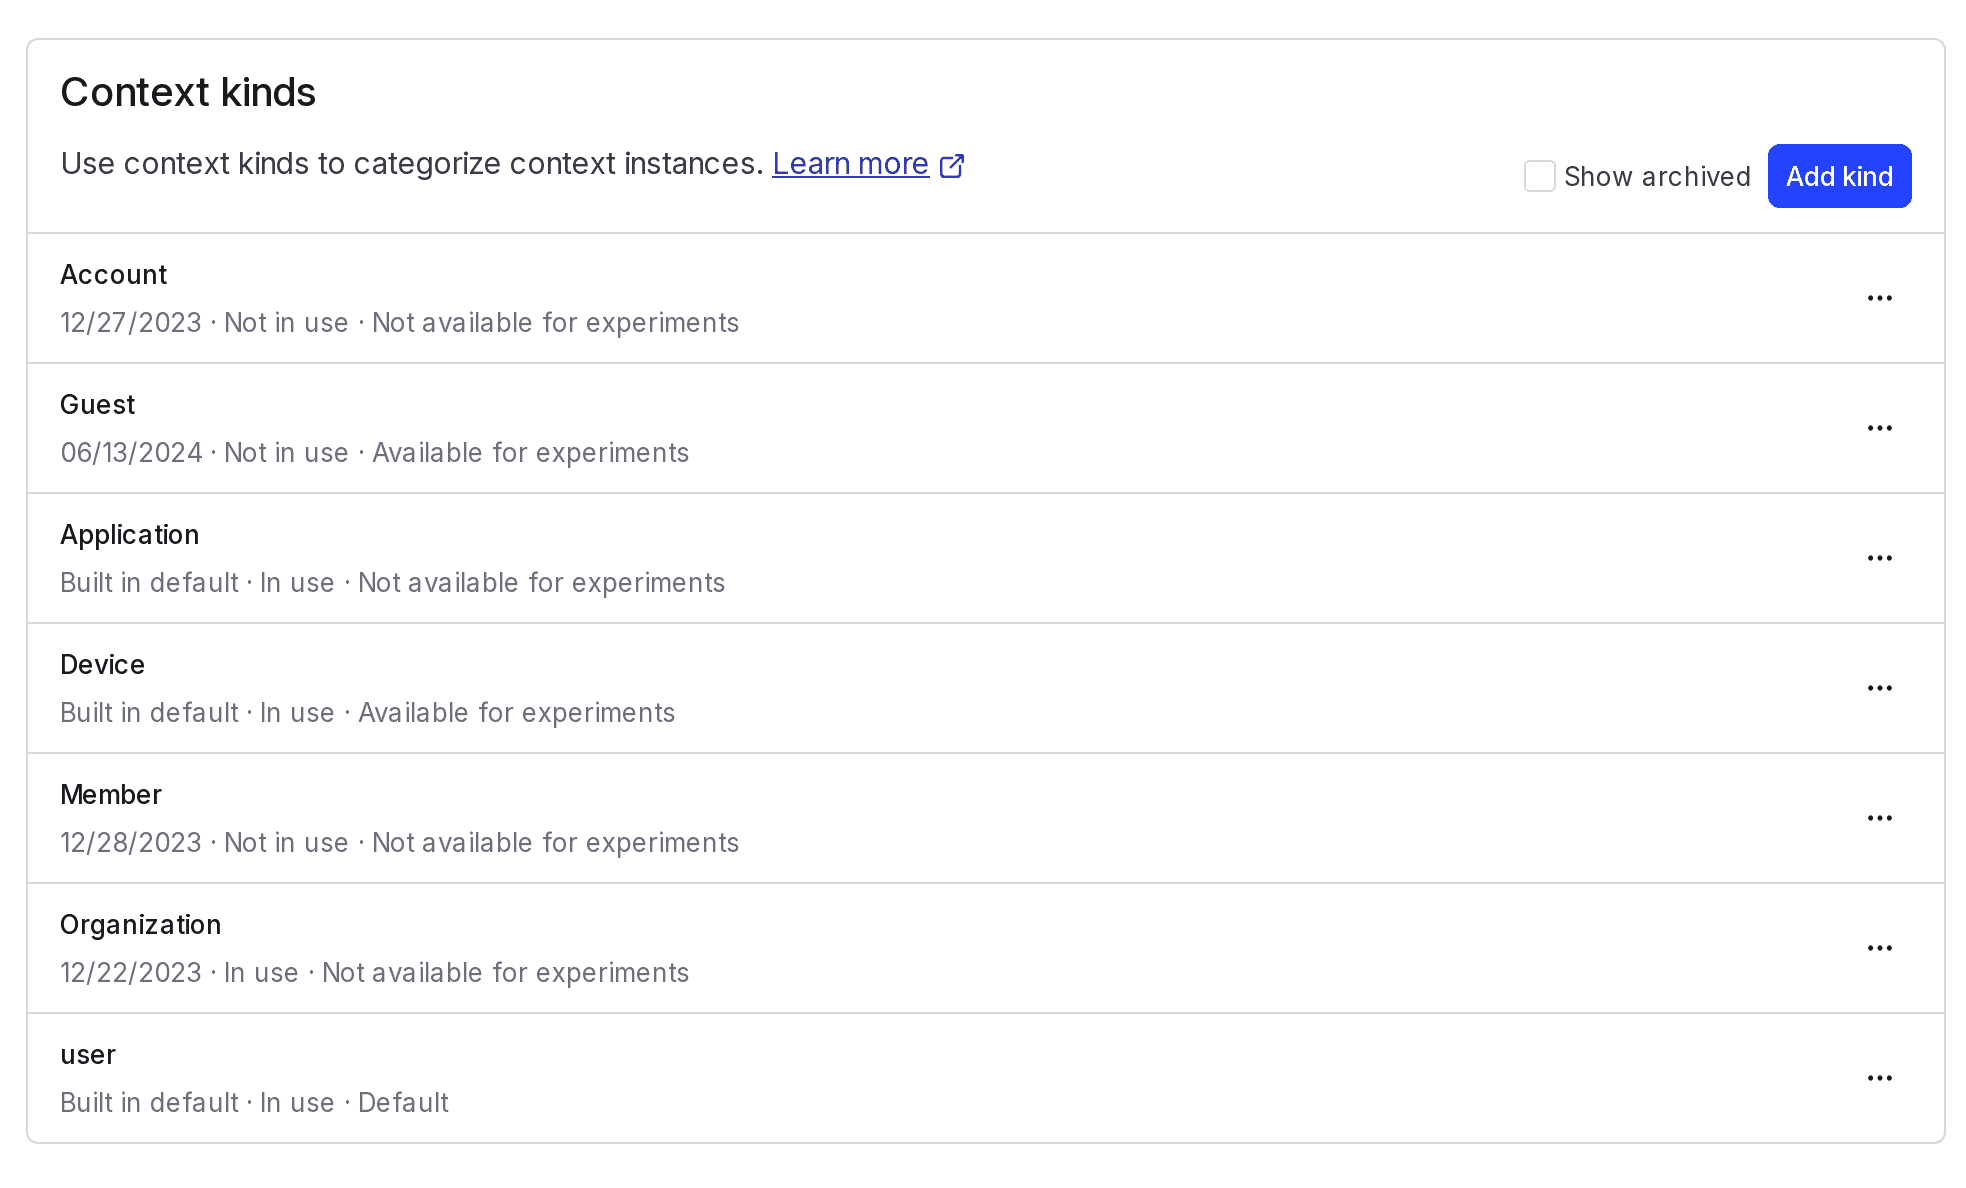
Context kinds and attributes
Every context has a context kind. "User" is a common context kind, but you can create context kinds for nearly anything. Other common context kinds include "organization," "device," and "account." To learn more, read Context kinds.
Context attributes include all of the information about a context that LaunchDarkly can use in a feature flag evaluation. LaunchDarkly has the following built-in attributes for contexts: kind, key, name, and anonymous. While LaunchDarkly provides built-in attribute fields for you to fill in, the SDK does not automatically collect any information. If you want to target your contexts based on any built-in attributes, you must supply their values.
In addition to built-in attributes, you can create your own custom attributes according to your needs. To learn more, read Built-in attributes and Custom attributes.
Multi-contexts
When you evaluate a feature flag within your application, the flag's targeting rules can use information from one or more kinds of contexts. For example, you might evaluate a flag using only the "user" context. Or, you might evaluate a flag using both the "user" context and the "device" context simultaneously. We refer to evaluations with more than one context as a multi-context. To learn more, read Context attributes.
You can configure your SDKs to send multi-contexts to LaunchDarkly, or you can create multi-contexts when you use an SDK's identify method to associate two contexts together.
Try it in your SDK: Identifying and changing contexts
Prerequisites
To complete this guide, you must have the following prerequisites:
- Access to a LaunchDarkly account with permission to edit flags.
- Access to the sections of your codebase that contain feature flags.
Migrate to contexts
To begin using contexts, you need to take the following steps:
- Familiarize yourself with updated elements of the LaunchDarkly user interface (UI).
- Update the Relay Proxy, if applicable
- Update your custom roles, if applicable
- Upgrade your SDKs
- Choose your context kinds
- Add contexts to your application code
- Update your flag targeting
- Review your experiments
- Confirm that SDKs are sending contexts to LaunchDarkly
- Remove legacy targeting from flags
- Remove legacy attributes from SDKs
Each of these steps is explained in detail below.
Familiarize yourself with the LaunchDarkly UI
Some parts of the LaunchDarkly UI have changed to include contexts. Although much of the functionality is similar, there are some new features and sections.
The following sections of the UI are new or have changed:
- The flag Targeting tab, including:
- The Contexts list, including:
Read about and learn how to navigate these sections before you update your flag targeting rules.
Update the Relay Proxy, if applicable
If you are using the LaunchDarkly Relay Proxy, you must update it to version 7.0 or later before you upgrade your SDKs. To learn more about upgrading, read the Relay Proxy 7.0.0 release notes. To upgrade to the latest Relay Proxy version, visit Relay Proxy releases on GitHub.
If you’re not sure whether you should use the Relay Proxy and want to learn more, read Relay Proxy use cases.
Update your custom roles, if applicable
If you are using custom roles, any existing roles with permissions to delete users will be able to delete context instances. Specifically, the deleteUser action is automatically aliased to the deleteContextInstance action. If your existing roles with permission to delete users should not be able to delete context instances, you must update those existing roles.
If you are using custom roles and would like to specifically allow or disallow creating or updating context kinds, you can update your roles with the Context kind actions.
Upgrade your SDKs
You can only use contexts if your SDKs support them. If you are a new customer, use the latest version of the SDKs and make sure they support contexts. If you are an existing customer, you must upgrade your SDKs to the latest versions. For a list of SDKs that support contexts and links to their migration guides, read SDKs.
Upgrading your SDKs should be minimally disruptive, as the major changes include changing from "user" to "context" types, and changes to certain functionality like aliasing.
Not all SDKs support contexts at this time. If you are still using SDKs that do not support contexts, be sure those SDKs are not evaluating flags that target context kinds. Those SDKs will not be able to evaluate the flag rules properly. We are continually adding support for contexts to more SDKs, so if a particular SDK isn't supported yet, check back for updates.
Plan for features that are no longer supported
Some SDK functionality is changing as part of upgrading to contexts. For a full list of changing features, read your SDK's migration guide.
One significant feature change is that SDKs that support contexts no longer support user aliasing. Instead, if you want to associate two contexts with each other, you should identify a multi-context. Unlike the aliasing method, the association doesn't persist between calls. You must send the contexts you want to associate in each variation or identify call and each track call.
Try it in your SDK: Identifying and changing contexts
Choose your context kinds
First, consider how you want to track and target your customers. "User" is the default context kind, and is automatically available for use. In addition to users, decide if you need to target particular organizations, businesses, locations, or account types. These categories will be your context kinds. You can add specific attributes later.
Some common context kinds include device, location, organization, and account type. You may already have a mental model of your "users" as stand-ins for other kinds of contexts. For example, if you have a custom user attribute of "organization" and you have many flags that target on that user attribute, you may want to create an "organization" context kind.
If you use experimentation, think about what context kinds you may want to run experiments on. You can target any context kind when building your experiment audience, as well as use certain context kinds as industry-standard randomization units. To learn more, read Allocating experiment audiences.
You may decide you don’t need additional context kinds beyond users. If that’s the case, we still encourage you to upgrade your SDK because doing so will give you more flexibility later. Even if you’re just tracking users, contexts allow you to more easily collect and store information about application IDs and application versions, as well as observe how your users are interacting with different parts of your app.
You don’t have to make any final decisions now. You can create context kinds ahead of time, in the LaunchDarkly UI, or when you evaluate flags. To learn more, read Context kinds.
Add contexts to your application code
First, follow the instructions in the SDK migration guides to update your client configuration and your variation and identify calls.
name attribute when you add contexts to codeWhen you add contexts to your code, you can specify various attributes to differentiate them. We recommend including the name attribute, which will let you target flags by a person's full name. To learn more, read Built-in attributes.
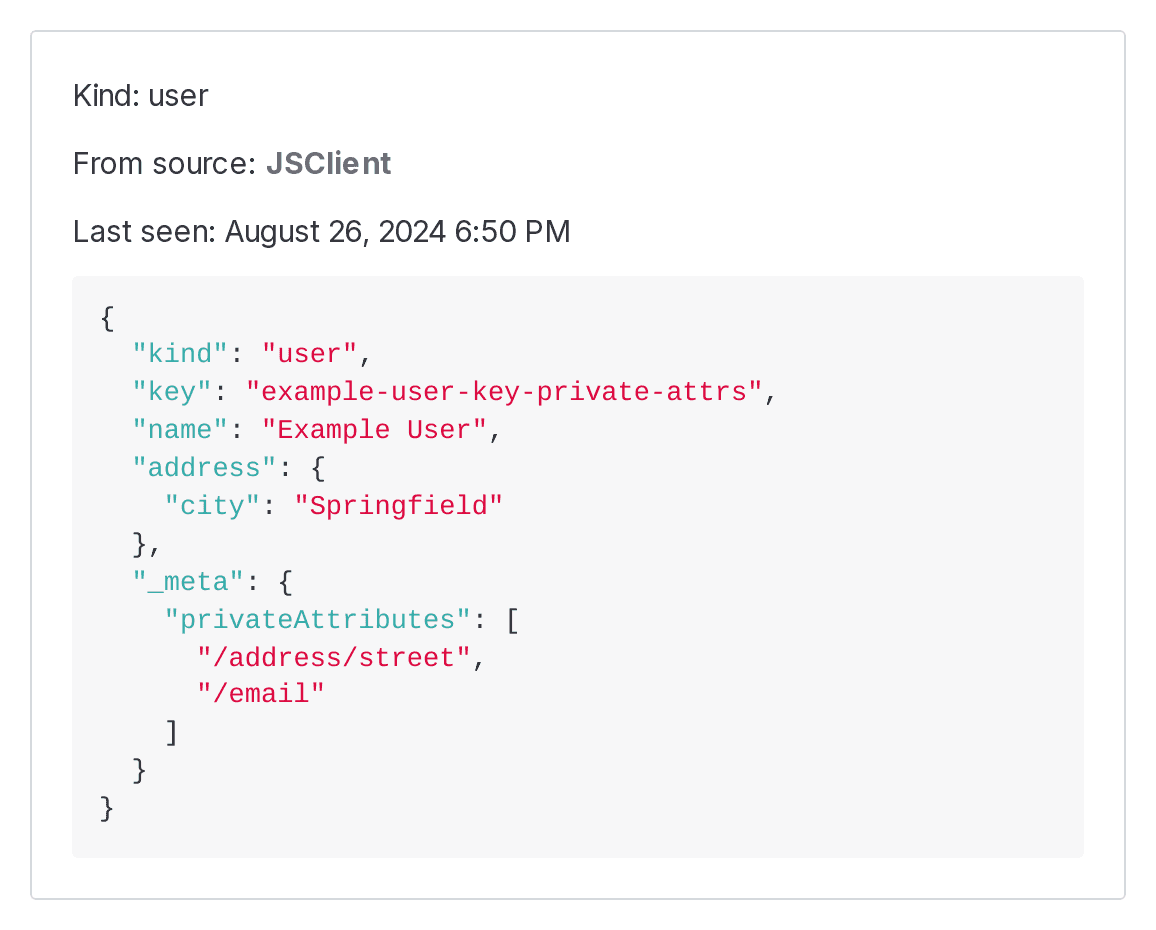
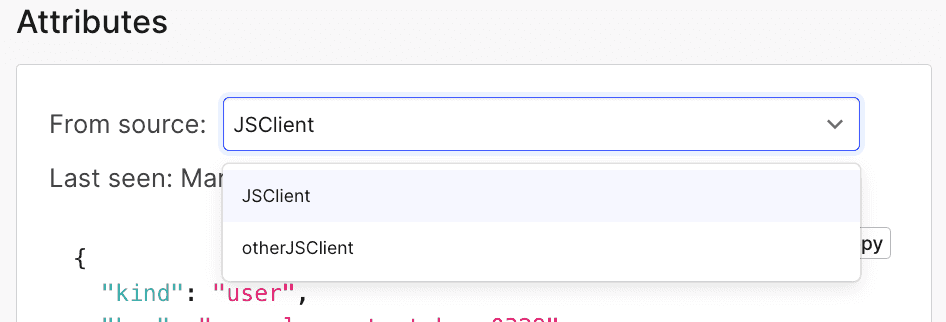
Then, consider if you want to customize your application metadata. You can view your default application metadata on a context's details page under "From source:" as context instance versions. To learn more, read The context details page.
Configure your SDK: Application metadata configuration
In this example, this context's instance version is "JSClient":
When to use multi-contexts
Think about when you want to use multi-contexts. For example, you may want to associate two user contexts, one logged in and one anonymous, into a multi-context. Or, you may want to sometimes target more broadly, such as everyone on an iPhone, and other times more closely, such as everyone on an iPhone in the eastern region with an Enterprise account type. In these cases, you may want to use multi-contexts.
For example, these multi-contexts have three contexts each:
- "user" with the attributes of "first name" and "last name"
- "organization" with an attribute of "name"
- "location" with an attribute of "city"
Here's an illustration:
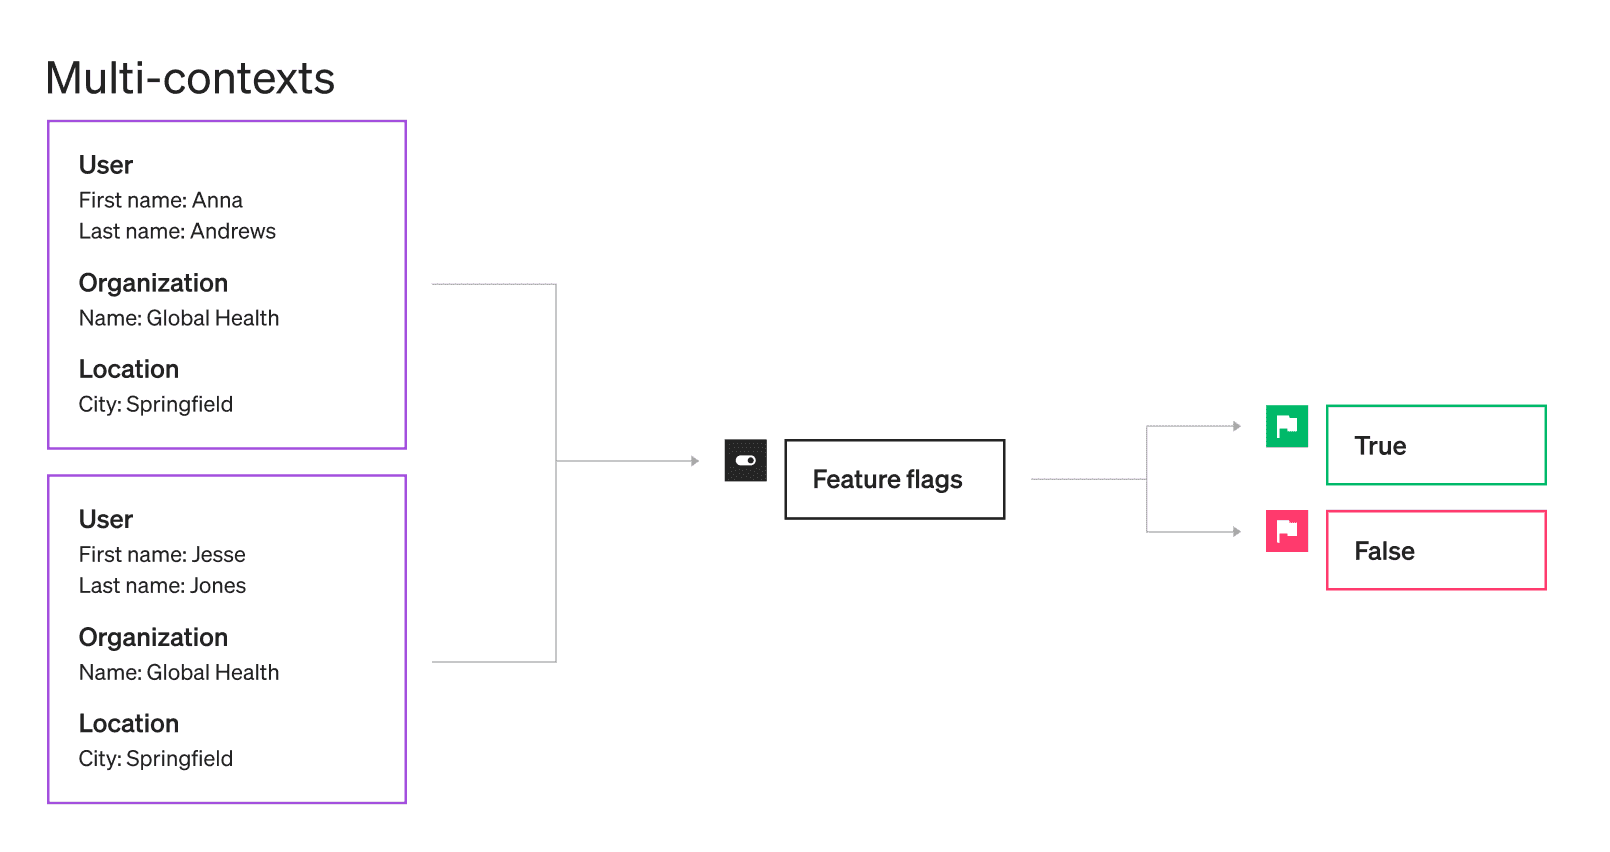
This configuration allows you to target the user, organization, and location all together to ensure you serve the correct variation. This helps eliminate risk and ensure accuracy in complex deliveries.
To learn more, read About context attributes.
Legacy user attributes
Any user attributes that were previously built-in and are no longer built-in for contexts (such as firstName, lastName, email, and so on) have become custom attributes. For any context kind other than "user," you must add the context kind and its associated attributes to your codebase. Then, map existing attributes to one or more contexts.
For example:
application-versionon the user object becomesversionon the "application" context kindstore-idon the user object becomeskeyon the "store" context kind
Now, application-version and store-id are legacy attributes.
Here is an example of a user object:
{"user": {"key": "user-key-abc123","name": "Sandy S","firstName": "Sandy","lastName": "Smith","email": "sandy@example.com","planType": "Enterprise","isTrial": false,"hasConfiguredSSO": false,"environmentId": "environment-id-123abc","memberId": "member-id-123abc","accountId": "account-id-123abc","organization": "Global Health Systems"}}
That user object, if translated into a multi-context with kinds of "account," "owner," "environment," "member," and "user" looks like this:
{"kind": "multi","account": {"key": "account-id-123abc","planType": "Enterprise","isTrial": false},"owner": {"key": "owner-key-123abc","email": "sandy@example.com","firstName": "Sandy","lastName": "Smith"},"environment": {"key": "environment-id-123abc"},"member": {"key": "member-id-123abc","email": "sandy@example.com","hasConfiguredSSO": false},"user": {"key": "user-key-abc123","name": "Sandy S","firstName": "Sandy","lastName": "Smith","email": "sandy@example.com","planType": "Enterprise","isTrial": false,"hasConfiguredSSO": false,"signupDate": 1641496710527,"environmentId": "environment-id-123abc","memberId": "member-id-123abc","accountId": "account-id-123abc","organization": "Global Health Systems"}}
The legacy attributes are all retained under the "user" kind.
Each of your application teams should modify their SDKs to send a multi-context, containing the "user" context kind and whatever other context kinds you’re using.
In the "user" context, include all of your legacy attributes. Pass any other contexts with their newly defined attributes. This ensures that your feature flags can still evaluate your contexts using the "user" context and its legacy attributes, in case there are any issues with the new context kinds during testing.
Update your flag targeting
Update your flags' individual targeting, targeting rules, and any default rules that are a percentage rollout. You can update them manually or use a script from LaunchDarkly to automate some parts of the process.
Use a script to update flag targeting
LaunchDarkly has a script that can perform some flag migration tasks for you. The script can identify flags that are ready to migrate and create approval requests for the maintainers of those flags asking them to approve the needed changes.
The script is open source, so you can modify it to perform more complex tasks based on your requirements. To learn more, read the script's README.
Download the script on GitHub.Update flag targeting manually
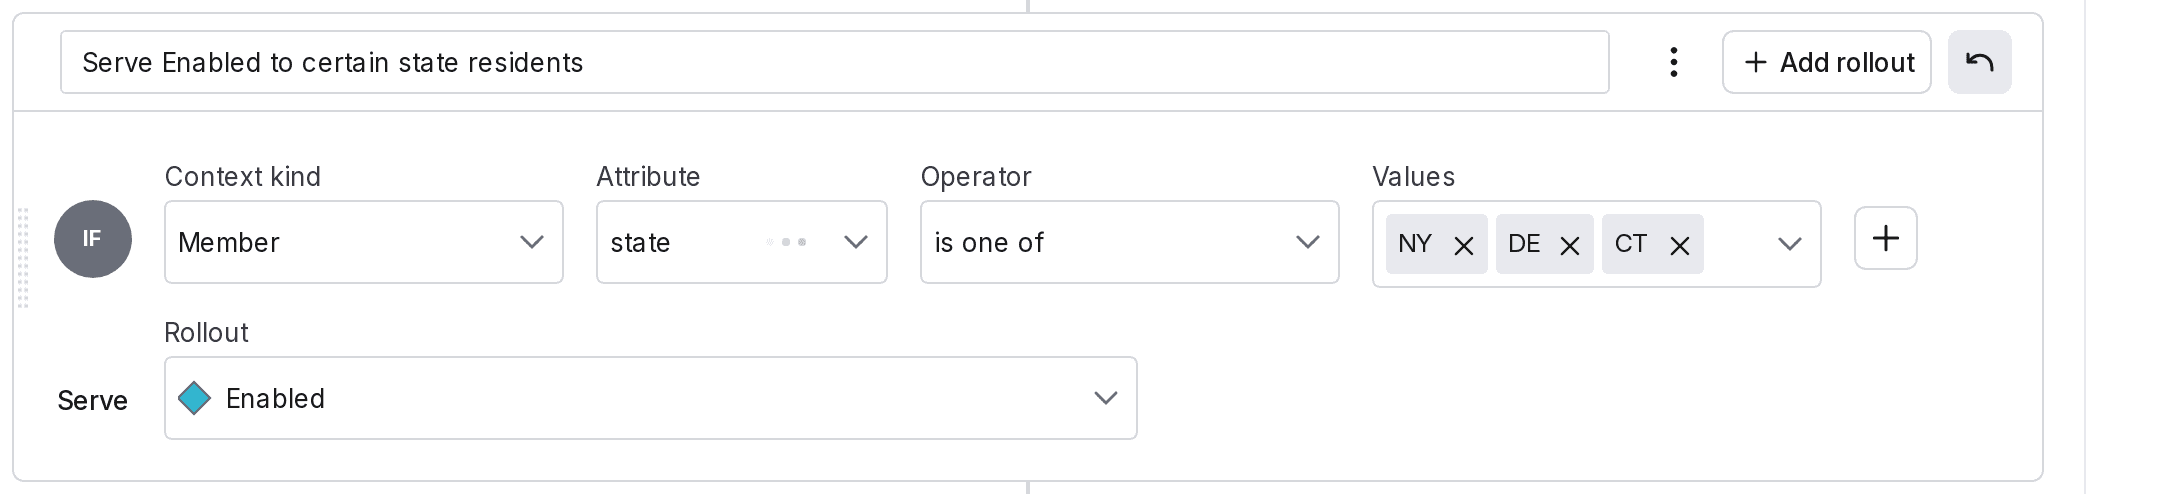
Your existing individual targeting, targeting rules, and rollouts automatically default to the "user" context kind and its legacy attributes. For any flags that need to target or roll out to new context kinds, you must recreate the associated rule or redefine the default rule to target the appropriate context and attributes, as applicable.
Here is an example of a flag targeting the "state" attribute of a "member" context kind:
Prerequisite flags
If you use prerequisite flags, do not update a prerequisite flag for contexts until all of its dependent flags are ready to be updated for contexts. Although you can update them in any order, we recommend completing the migration of all a flag's dependent flags before updating the prerequisite flag. To learn more about prerequisite and dependent flag relationships, read Flag prerequisites.
Segments
Rule-based segments and smaller list-based segments can target by multiple context kinds. Larger list-based segments and synced segments can target by any single context kind. To learn more, read Segments.
You may be familiar with the concept of a "big segment," which is a term we previously emphasized in the LaunchDarkly documentation and user interface to describe some segments.
A big segment is a segment that is either a synced segment, or a list-based segment with more than 15,000 entries that includes only one targeted context kind. LaunchDarkly uses different implementations for different types of segments so that all of your segments have good performance.
If you use segments, we recommend that you do not update a segment for contexts until all of the flags targeting that segment are ready to be updated for contexts. If you use rule-based segments, but not all related flags are ready to be updated yet, you can add new context targeting rules while keeping the segment's existing user targeting rules. Later, after you have updated all related flags for contexts, remove the segment's old user targeting rules.
Review your experiments
If you have decided to add new context kinds, you should review your running experiments to determine if they need changes. LaunchDarkly automatically updates any running experiments to target user kinds. However, if you decide to edit a flag's targeting rule to target a different context kind, you must start a new iteration of that experiment.
For new experiments, the flag can target any context kind when building your experimentation audience, and you can assign variations by any context kind that maps to an industry-standard randomization unit when you allocate your experiment’s traffic. To learn more, read Randomization units.
Confirm that your SDKs are sending contexts to LaunchDarkly
You can verify that you’re targeting contexts as you expect on the Contexts list. Click the filter icon and filter the list by context kind:
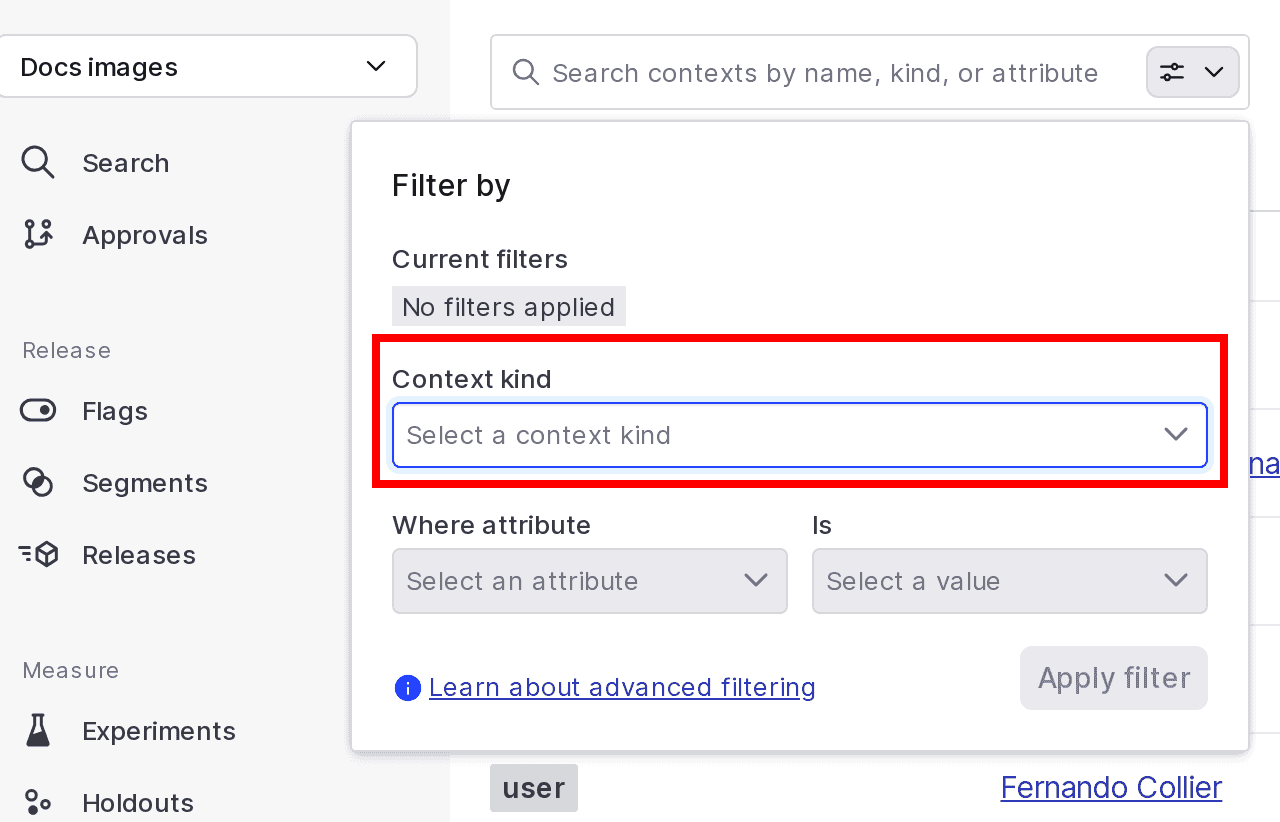
If your new context kinds don't appear in the Context kind menu in the "Filter by" dialog, your SDKs may not be set up correctly.
To learn more, read Filtering the Contexts list.
You should also be able to look at individual context details pages to view the context's attributes and instances. To learn more, read The context details page.
About context instance versions
The context details page displays attribute information from the evaluation contexts that your SDK has sent to LaunchDarkly for evaluation. In some cases, there may be multiple context instance versions available on this page. A context instance version is a context instance that's recorded from a unique source application or LaunchDarkly SDK.
If you are using multiple SDKs in your application, you might have two SDKs that evaluate contexts with the same kind and key, for example, an organization with context kind "organization" and context key "org-key-123abc." These appear on the context details page as separate context instance versions. On the context details page, you can use the "From source" dropdown in the "Attributes" section to view these two context instance versions.
Suppose one of your two SDKs sends an evaluation context with one additional custom attribute, and the other SDK sends an evaluation context with the same kind and key, and with six additional custom attributes. You'll need to use the "From source" dropdown to switch between the different context instance versions and view all of the attributes.
In the analogous situation when working with users, LaunchDarkly merged these attributes, and the users detail page showed a single user with seven custom attributes.
To learn more, read Attributes and Context instances.
Remove legacy targeting from flags
After you upgrade all of your SDKs to support contexts, you can remove your legacy rules and targeting from your flags, as well as any legacy default rules configured as rollouts.
You should only complete this step after all of the SDKs you use support contexts, and you have upgraded all of them to the latest versions. If you have any SDKs that don't support contexts yet or you haven't upgraded yet, your flag rules will not work with those SDKs.
If you're not ready to remove your legacy targeting yet, you can also "disable" them by adding a nonsense condition to the rule that will never match any users. However, this is a temporary solution and you should eventually remove the rule to keep your flags clean.
Remove legacy attributes from SDKs
After you have confirmed that your SDKs and flag rules are working correctly, you can remove any legacy attributes from your application code. You are now fully migrated to contexts.
Conclusion
In this guide, you learned about how to upgrade your SDKs and edit your feature flags to begin using contexts. Contexts give you greatly expanded flexibility to precisely target end users, devices, organizations, and other entities to meet your complex business needs. As you begin using contexts, don't hesitate to contact us with your feedback.
Your 14-day trial begins as soon as you sign up. Get started in minutes using the in-app Quickstart. You'll discover how easy it is to release, monitor, and optimize your software.
Want to try it out? Start a trial.