This topic describes updates to the LaunchDarkly user interface (UI), which are available starting in May 2024.
Our May 2024 release includes a new product navigation and multi-environment view. With the new navigation, you can access the resources you need more quickly and efficiently, including viewing your flag's status across environments.
Use this topic if you have any questions about finding functionality in the new multi-environment view. Each section includes a table describing the main changes. Click any image in the table to enlarge.
Projects
Multi-environment view
Legacy navigation
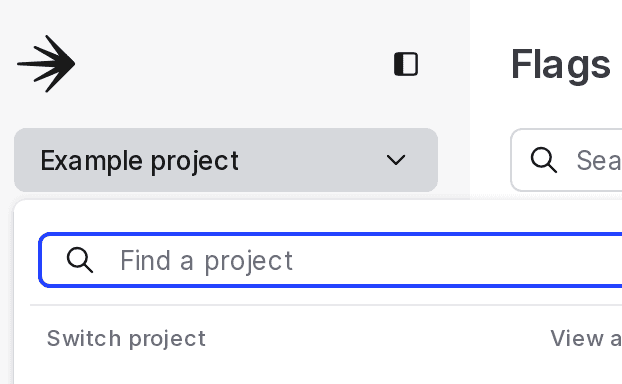
Use the project dropdown to switch projects, or to access project settings for the current project. Project settings include environments, flag settings, release pipelines, and context kinds. Some flag settings, for example, flag key conventions, can only be specified in multi-environment view. The project menu.
Use the Switch environment menu to change which project and environment you are viewing. To access environment or project settings, click Account settings from the left sidenav and navigate to the Projects tab. The "Switch environment" menu.
Environments and SDK credentials
Multi-environment view
Legacy navigation
Click + to add your commonly used environments to your list pages. Each list page includes summary or status information for all environments you add. The "Flags" list with the "+" icon to add environments called out.
List pages only display information for the currently selected environment.
To create or edit environments, click the project dropdown and select Project settings. Then select Environments. The project menu.
To create or edit environments, select Account settings and then Projects. Then click the name of the project in which you want to update environments. The "Projects" tab on the "Account settings" page.
To copy the SDK credential for an environment, click the overflow menu for the environment on any page where you have added the environment. Under "Copy...", choose SDK key, Mobile key, or Client-side ID from the menu. An environment "overflow" menu.
To copy the SDK credential for an environment, select Account settings and then Projects. Click the name of the project in question. Then, copy the SDK credentials from the list. A list of environments within a project, including SDK credentials.
Flags
Multi-environment view
Legacy navigation
To view flag targeting information by environment, click the environment names at the top of the page. Click + to add additional environments. The flag targeting page with the "+" icon to add environments called out.
To view flag targeting information by environment, use the Switch environment menu. The "Switch environment" menu.
To update flag targeting rules, select the flag from the Flags list and review its targeting information.
To update flag targeting rules, select the flag from the Flags list and navigate to the Targeting tab.
To view or modify flag variations, flag settings, change history, or other flag information, use the sidebar on the right of the flag targeting page. The right sidebar on a flag targeting page.
From the flag's Targeting tab, choose the correct tab to access flag variations, settings, history, or other information. The tabs available for a feature flag.
To compare flags, navigate to the Flags list or to a flag's targeting page. Click the three-dot overflow menu for one of the environments you want to compare. The environment overflow menu.
Navigate to the Flags list and click the overflow menu. Then choose "Compare flags." The Flags list with the "Compare flags" button called out.
To view total flag evaluations, navigate to the Flags list and hover over the flag's status. For additional detail, select the flag from the Flags list and open the "Evaluations" section on the flag detail page. The Flags list when hovering over the flag status. The flag detail page with "Evaluations" section expanded.
To view total flag evaluations, navigate to the flag's Insights tab. The flag "Insights" tab.
Segments
Multi-environment view
Legacy navigation
From the Segments list, click the environments at the top of the list to review the segments defined in each environment. The "Segments" list with the "+" icon to add environments called out.
Use the Switch environment menu to change environments and review the segments defined for a single environment. The "Switch environment" menu.
To view or modify segment settings, or to delete a segment, navigate to the segment detail page for the segment you want to update. Click the gear icon in the right panel to manage segment settings.
To view or modify segment settings, or to delete a segment, navigate to the segment detail page for the segment you want to update. Navigate to the Settings tab.
Audit log and change history
Multi-environment view
Legacy navigation
To view changes, click the clock icon from any page. The "Change history" dialog appears. It is automatically filtered based on the page from which you clicked the clock icon. For example, clicking the clock icon on the Project settings page is equivalent to viewing the Audit log in the legacy navigation. In the "Change history" dialog, you can update the filters as needed, including removing filters to view all changes. A portion of the Flags list, with the "clock" icon highlighted.
To view all changes, select Audit log from the left sidenav. To view changes for a particular resource, navigate to that resource and then click the History tab. The "History" tab for an individual flag.
Integrations
Multi-environment view
Legacy navigation
Click the gear icon in the left sidenav to view Organization settings. Then click Integrations. The "gear" icon in the left sidenav.
Click Integrations from the left sidenav.
Settings
Multi-environment view
Legacy navigation
Click the gear icon in the left sidenav to view Organization settings. Use the side navigation to access Integrations, as well as billing, access, configuration, and security settings. The "gear" icon in the left sidenav.
Click Account settings and navigate to a specific tab for billing, access, configuration, and security settings. The tabs available under "Account settings."
Profile
Multi-environment view
Legacy navigation
Click your member icon in the left sidenav and choose Personal settings from the menu. The account menu.
Click your member icon from the top navigation and choose "My profile" from the menu. The account menu, with "My profile" option called out.
Switching experiences
This section only applies to members who joined a LaunchDarkly account before May 13, 2024.
Multi-environment view
Legacy navigation
Click your member icon in the left sidenav and choose Feature preview from the menu. In the Feature preview dialog, toggle the "New experience" on or off. The account menu, with "Feature preview" option called out.
Click your member icon and choose Feature preview from the menu. In the Feature preview dialog, toggle the "New experience" on or off. The account menu, with "Feature preview" option called out.