Salesforce
Read time: 6 minutes
Last edited: May 30, 2024
The Salesforce integration is available to customers on an Enterprise plan. To learn more, read about our pricing. To upgrade your plan, contact Sales.
Development work on this integration is ongoing. Elements of this integration may change without notice.
Overview
This topic explains how to set up and use the LaunchDarkly Salesforce integration.
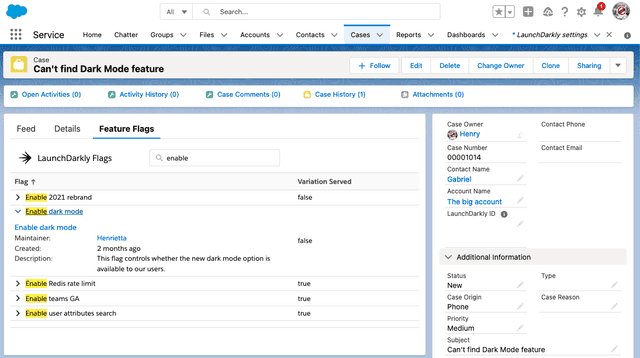
The LaunchDarkly Salesforce integration gives you and your account members a read-only view of your feature flags. You can view the flag variations LaunchDarkly serves to your customers without leaving Salesforce. This is useful for customer success and support teams working with customers to debug issues or access new features.

Prerequisites
In order to install and configure the LaunchDarkly Salesforce integration, you must have the following prerequisites:
- A LaunchDarkly Enterprise plan
- Integration seats from the Salesforce AppExchange that allow you to use the integration
- A Salesforce role that allows you to install AppExchange applications and configure connected apps, custom metadata, and page layouts
Set up the LaunchDarkly Salesforce integration
Setting up this integration will require you to switch between the LaunchDarkly platform UI and your Salesforce account UI multiple times. It will be most convenient for you if you open each platform in a different browser tab so you can switch between them easily.
First, you must allow users in your Salesforce account to access the LaunchDarkly Salesforce app.
- Contact your LaunchDarkly representative and ask them to generate a beta installation URL for this integration. After they provide the URL to you, continue with this procedure.
- Navigate to the Salesforce AppExchange.
- In Salesforce, click Setup and type "Connected apps" in the Quick Find search box on the top left corner of the screen.
- Choose Manage Connected Apps.
- Find the LaunchDarkly connected apps record and click Edit.
- In the OAuth Policies section, find the Permitted Users menu and select "Admin approved users are pre-authorized."
- Acknowledge the confirmation that appears.

- Click OK and Save.
- From the Manage Connected screen, click LaunchDarkly.
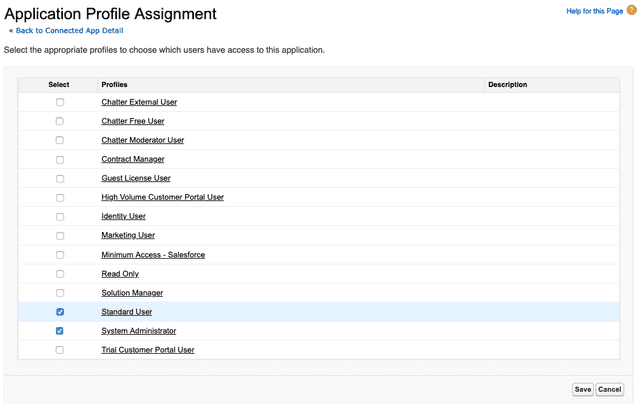
- Scroll to the Profiles section and click Manage Profiles.
- Choose the user profiles you wish to grant access to the LaunchDarkly Salesforce app.
- Click Save.

This allows Salesforce users to access the LaunchDarkly Salesforce app.
Connect LaunchDarkly to Salesforce
Next, you must configure the LaunchDarkly component to bring your flag data into the Salesforce "Record" page.
- In LaunchDarkly, create a new service token with a Reader role. To learn more, read Service tokens.
- In Salesforce, click the nine-dot icon to open the app launcher.
- Search for and select LaunchDarkly settings.

- Click Edit. A text field appears.
- Enter your LaunchDarkly service token in the text field and click Save.

- Navigate to a record page for the object type you wish to embed the LaunchDarkly Salesforce app. Example object types include "Account" and "Case."
- Click the nine-dot icon and choose Service.
- Click Case and create a new case, or select an existing case to view.
- Click the gear icon and choose Edit Page.

-
Search for LaunchDarkly on the Components section of the screen and drag the LaunchDarkly component onto the page layout. We recommend placing the component in a new tab, but you can place the component anywhere that works best for your team.
-
Configure the following fields:
- Project key: The key of the LaunchDarkly project you wish to associate with the component.
- Environment key: The key of the LaunchDarkly environment you wish to associate with the component.
- Tag: (Optional) The feature flag tag filter you wish to associate with the component. If omitted, all of the project's feature flags are included in the component.
- User key field: The Salesforce API field name of the record field that maps to LaunchDarkly feature flag evaluation context keys. This can be a built-in field, such as
AccountId, or a custom field such asLaunchDarkly_ID__c.

- Navigate back to the sample record page and confirm that the LaunchDarkly integration is visible on the record page.
LaunchDarkly previously referred to context keys as "user keys." Where Salesforce asks for a "user key," you should provide a LaunchDarkly context key.
Use the LaunchDarkly Salesforce integration
To get the best experience from the integration, we recommend configuring the Tag field to a tag in LaunchDarkly that has been applied to 15 or fewer feature flags. In some cases, it may be easier to set the Tag field to a new tag like salesforce or customer-facing and selectively add that tag to the feature flags of your choice in the flags list.
Be sure to notify your account members of how this tag is being used so they can accurately tag any relevant flags.
To learn more about adding tags to feature flags, read Other flag settings.
Troubleshooting
This section includes some issues with the integration you may experience and how to address them.
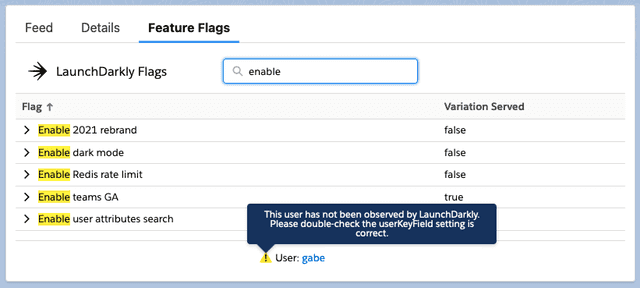
There is a warning icon at the bottom of the integration

The warning icon (⚠) at the bottom of the integration next to "User" means LaunchDarkly has not observed any flag evaluations for this context in the past 30 days.
Unless the context is new or inactive, you may have misconfigured the User key field. The User key field should be mapped to a field on the Salesforce record page that represents the context key LaunchDarkly uses to evaluate feature flags.
If you are unsure what the Key field should look like, visit the Contexts list in LaunchDarkly and inspect the "Key" column. To learn more, read The Contexts list.

Cannot load flag data for user because 'Field' is empty.

This message means the current record page does not have anything set in the User key field.
If you do not wish this message to display on records that do not have the User key field filled out, consider configuring a component visibility rule on the Salesforce Lightning App builder page. To learn more, read Dynamic lightning pages in Salesforce's documentation.
No such column 'User key field' exists on entity 'Record'.

This message means the User key field does not exist on the record page.
To view all available API fields:
- In Salesforce, click the Gear icon and click Setup.
- Click into the Object Manager tab and click the record you wish to view.
- Click Fields & Relationships. You can configured the User key field to anything in the Field Name column of this page.