Environment settings
Read time: 5 minutes
Last edited: Dec 02, 2024
Overview
This topic explains the settings available for environments in LaunchDarkly.
Settings are available from both the "Edit environment" panel and the "Approval settings" panel. This topic describes the "Edit environment" settings. To learn more about approval settings, read Configuring approvals for an environment.
Edit environment settings
To view or update the settings on the "Edit environment" panel:
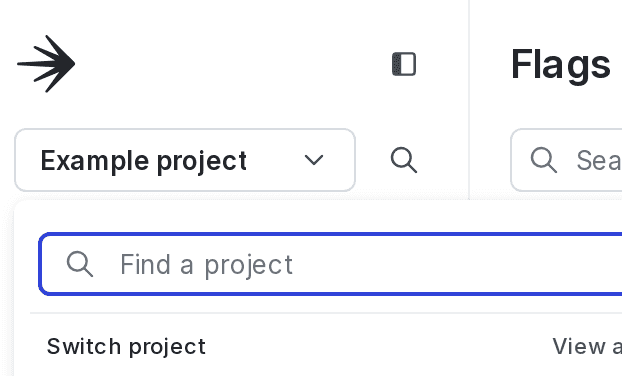
- Click the project dropdown. The project menu appears:

- Select Project settings.
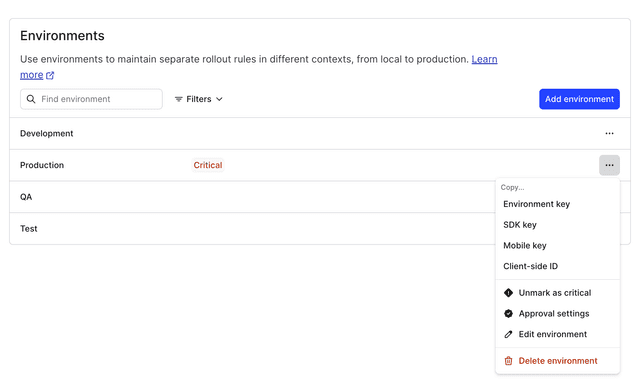
- Select Environments. The Environments list appears.
- Click the overflow menu next to your environment.
- Select Edit environment.
- Update the settings, then click Save environment.
- Click X to close the "Edit environment" panel without saving changes.
The "Edit environment" panel includes the following settings:
| Setting | Description | Learn more |
|---|---|---|
| Name | The environment name | |
| Tags | Customizable labels used for categorization | Tags |
| Critical environment | An environment that affects your customers or the health of your systems | Critical environments |
| Require comments | Whether to require a comment before saving flag or segment changes | Required comments |
| Require confirmation | Whether to require entering the name of the environment before saving flag or segment changes | Required confirmation |
| Enable secure mode | Ensures that one end user cannot inspect flag variations for another end user when you use some client-side SDKs | Secure mode |
| Send detailed events to Data Export destinations | Whether to export evaluation events for end users that encounter the flag | Data Export |
| TTL | Number of minutes that the PHP SDK can cache feature flag rules locally | TTL settings |
| Environment Color | The color used to indicate this environment in the LaunchDarkly UI | |
| Keys | The credential required to use a LaunchDarkly SDK to evaluate flags in this environment | Copy and reset SDK credentials for an environment |
Environment keys
You can view and copy an environment key from the Environments list:

You may need the environment key when configuring certain integrations.
Copy and reset SDK credentials for an environment
You can view the SDK key, mobile key, and client-side ID for an environment from the Environments list. You need one of these credentials when you set up your SDK. Which credential you need depends on which SDK you use:
- Use SDK keys for server-side and AI SDKs. SDK keys should be kept secret. If an SDK key is exposed, you can reset it.
- Use mobile keys for some client-side SDKs. Mobile keys do not need to be kept secret. However, if you wish to reset a mobile key, you can.
- Use client-side IDs for JavaScript-based client-side SDKs and for edge SDKs. The client-side ID does not need to be kept secret and cannot be reset.
To learn more about different SDK key types, read Understanding the different types of SDKs and Keys.
Copy SDK credentials for an environment
To copy an SDK key, mobile key, or client-side ID:
- Click the project dropdown. The project menu appears:

- Select Project settings.
- Select Environments. The Environments list appears.
- Click the overflow menu for the environment.

- Click SDK key, Mobile key, or Client-side key to copy the key.
Reset SDK credentials for an environment
To reset an SDK key or mobile key:
- Click the project dropdown. The project menu appears.
- Select Project settings.
- Select Environments. The Environments list appears.
- Click the overflow menu for your environment.
- Select Edit environment. The "Edit environment" panel appears.
- In the "Keys" section click Reset SDK key or Reset mobile key.
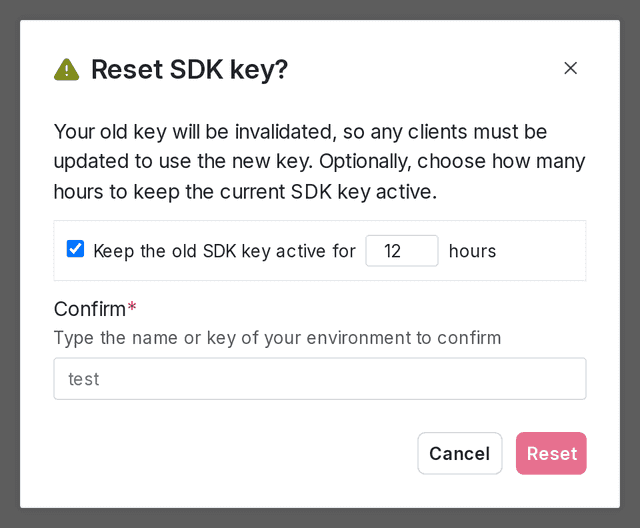
- (Optional) If you are resetting an SDK key, choose how many hours to keep the current SDK key active for, up to 720 hours (30 days). During this period, both the current SDK key and the new SDK key will work. This option is not available for mobile keys.
- Enter the name or key of your environment:

- Click Reset.
You can also use the REST API: Reset environment SDK key, Reset environment mobile SDK key
TTL settings
This setting controls how long the PHP SDK can cache feature flag rules locally. You only need to configure this if you are using the PHP SDK.
Each environment also has a time-to-live (TTL) setting. This sets the number of minutes that the PHP SDK can cache feature flag rules locally. The TTL is only used in the PHP SDK, because PHP's shared-nothing architecture makes LaunchDarkly's streaming model impossible. To learn more, read the PHP SDK reference.
For customers using PHP, we recommend setting your TTL to at least five minutes in production environments. This lets the PHP SDK cache feature flag rules for five minutes, so most calls to variation will not make a remote request. The tradeoff is that changes you make to your feature flag rules on your Flags list will not take effect for five minutes.
If your site has relatively low traffic (fewer than one request per minute), you may wish to increase the TTL to five minutes or more to take better advantage of the local cache.
If the TTL is set to zero minutes, the SDK will not use a local cache, and every call to variation will make a remote request to our CDN. You can set your TTL to zero in testing environments so it reflects changes immediately, but we do not recommend a zero minute TTL in production.
In high volume PHP environments, we strongly recommend using our Relay Proxy. To learn more, read The Relay Proxy.
To set the TTL:
- Navigate to the Account settings page.
- Click the Projects tab.
- Click the name of the project. The project page appears.
- Click the overflow menu next to your environment.
- Select Edit environment. The "Edit environment" panel appears.
- Enter a value in the TTL input and click Save environment.