Configuring roles with no access
Read time: 3 minutes
Last edited: Dec 14, 2024
The No access role is only available to customers on select plans. To learn more, read about our pricing. To upgrade your plan, contact Sales.
Overview
This guide explains how to configure custom roles to start with no access to LaunchDarkly, and how to create new members that have the built-in No access role by default.
Some organizations, especially those in highly regulated industries, do not want members to be able to view everything in their LaunchDarkly account when they first join. To prevent an account member from accessing any part of the LaunchDarkly platform, you can assign them the built-in No access role. This role is for members who shouldn't be able to view or modify anything until you give them access to specific areas of LaunchDarkly.
The No access role can help your organization manage access to resources within LaunchDarkly and enforce security best practices, such as the principle of least privilege.
To learn more about built-in roles and their permissions, read LaunchDarkly's built-in roles.
Prerequisites
In order to complete this guide, you must have the following prerequisites:
- An Owner or Admin role in your LaunchDarkly account, or a custom role with the ability to update member roles. To learn more, read Role actions.
- An Enterprise plan with LaunchDarkly
Concepts
This guide relies on the following concepts:
LaunchDarkly's built-in roles
Every LaunchDarkly account has four built-in roles: Reader, Writer, Admin, and Owner. Customers on an Enterprise plan also have a restricted No access role.
Every account member must have at least either one of these built-in roles or a custom role.
To learn more about built-in roles, read LaunchDarkly’s built-in roles.
Custom roles
Custom roles give you precise access control to everything in LaunchDarkly, including feature flags, projects, environments, metrics, and teams, so you can enforce access policies that meet your exact process needs.
To learn more about custom roles, read Custom roles.
Create custom roles with no access
LaunchDarkly uses the built-in No access role as the starting point for new custom roles.
However, custom roles created prior to October 2024 had the option to use the built-in Reader role as their starting point, rather than starting with no access.
To check whether this applies to any of your existing custom roles, edit the custom role and look for the warning statement "This role currently has base permissions set to Reader. Members can view all LaunchDarkly content." Uncheck the box to update the role so that it starts with no access and only allows actions based on the statements in its policy.

Members must be able to view resources to be able to modify them. If you give a member access to modify a resource without also giving access to view the project the resource is in, the member won't be able to modify the resource because they won't be able to view it. A member needs both the ability to modify and the ability to view a resource in order to interact with it.
Set the No access role for teams
Large customers with many members may find that it is easiest to manage access using the teams feature rather than individually-assigned custom roles. You can automatically assign new members the No access role, then grant them access to resources by adding them to specific teams with assigned custom roles to give them additional permissions. To learn more, read Teams.
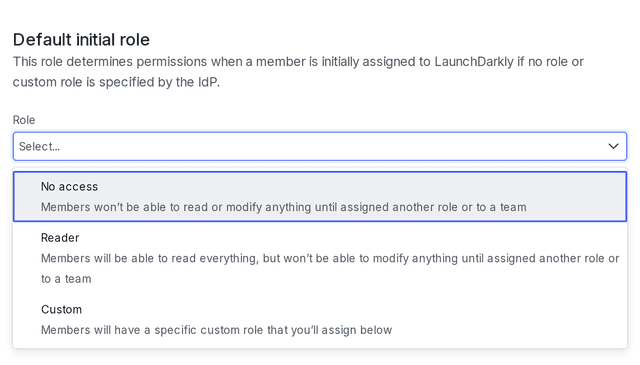
Change default roles to No access
If you have not specified a role or custom role for new LaunchDarkly members through your IdP, LaunchDarkly sets the default role to Reader. Enterprise customers can change the default role to No access. To learn how, read Single sign-on.
