Using LaunchDarkly with AWS Lambda
Read time: 20 minutes
Last edited: Nov 12, 2024
This documentation is not updated to include changes due to LaunchDarkly's contexts feature.
To learn more about custom contexts, read Contexts.
Overview
This guide explains how to connect LaunchDarkly with an AWS Lambda serverless function and deploy this function to Lambda@Edge.
Serverless functions play a critical role in modern application architectures. For many applications, particularly applications built with a microservices architecture, serverless functions are the core of any server-side logic and data retrieval.
In this guide, you'll explore how to build a serverless function with AWS Lambda and how you can use LaunchDarkly flags and Lambda functions to conditionally enable or modify server-side logic. In addition, you'll learn how to deploy this to CloudFront, Amazon's content delivery network (CDN), as Lambda@Edge so you can use the flags to conditionally perform actions at the "edge."
The example function you will build redirects viewers to a different version of a website. It is better to do this "at the edge" to limit any latency they might experience during the request. Rather than intercept the request on the server and do a server-side redirect or send back a response that performs a client-side redirect, you can intercept the request at the closest CDN level and direct it to a specific version of the site. Serving a flag variation from the edge means faster state changes to feature flags, and no disruptions when the flag state changes from the default value to the targeted variation.
Prerequisites
To complete this guide, you must have the following prerequisites:
- An AWS account
- A LaunchDarkly account
- A way to build and deploy a Lambda function
The example below uses the AWS Toolkit for Visual Studio Code, which makes it easy to download, upload, and test our Lambda Function within Visual Studio Code (VS Code).
The source code for the example below is available on GitHub.
Example: Controlling a percentage release from the edge
Let's imagine your company is launching a rebrand that includes a new site design. This is a major undertaking and the marketing department wants to be sure that everything is perfect. Rather than enable a flag to deploy the site to everyone, they want to roll out the new site to an increasing percentage of people over time. How can you do this without it becoming a major DevOps headache?
In this example, you'll use LaunchDarkly to control the release. LaunchDarkly will assign each end user to a variation that determines whether they receive the new site or the old site. An AWS Lambda@Edge function will use this information to route them to the appropriate version of the site at the edge, rather than relying on a client-side or server-side redirect.
After you create a Lambda function, end users will either be directed to the old site or the new site depending on which variation they are assigned to within LaunchDarkly. LaunchDarkly determines this by assigning each unique end user according to a percentage rollout.
To learn more about percentage rollouts, read Percentage rollouts.
Set up AWS
Before we can start coding, you must set up AWS.
Here are the resources we need:
-
An S3 bucket: S3 is Amazon's storage solution where you can house and retrieve arbitrary files, including the static website for this example. The site is intentionally simple. It has an index page in the root as well as a
/betafolder that contains the same page with the new branding. -
A CloudFront distribution – You need this to run a Lambda function with AWS's edge servers (Lambda@Edge) on their CloudFront CDN.
There are two ways that we can set this up. The quickest way is to use an AWS CloudFormation template that creates both the S3 bucket and CloudFront distribution for you. The second is to set both of these up individually with the AWS console.
To simplify the steps in the following procedures, when you upload resources to CloudFormation and S3, you upload everything into a folder, rather than into the root of the bucket. This means that you must append the /site folder in each URL.
For example purposes, we are manually creating the infrastructure on AWS. However, there are a number of tools such as Terraform that allow you to build an infrastructure as code workflow to create AWS resources. You can even integrate LaunchDarkly with Terraform.
Use CloudFormation
A CloudFormation template is available in the GitHub repository. You must have the CloudFormationTemplate file available locally on your machine.
- In the AWS console, search for CloudFormation and then click Create stack.
- Choose the "Template is Ready" option and "Upload a Template." Select the
CloudFormationTemplatefile that you downloaded from the repository. Click Next. - Give the stack a human-readable name and click Next.
- On the "Configure stack options" step, accept all the defaults and click Next.
- Review the details and click Create stack. Wait for creation to complete before you continue. This can take several minutes.
- When the S3 bucket is ready, search for "S3" in the AWS console and locate the bucket you created.
- Click Upload and then Add folder. From the source repository, upload the
/sitefolder containing both the existing site'sindex.htmlandlogo.png, and a/betafolder containing the new site. Click "Upload" and, when the procedure completes, click "Close." - Select the
sitedirectory in your bucket. From the Actions pull down select "Make public," click to confirm and then click "Close."
Manually set up an S3 bucket
First, you must set up the S3 bucket and put the web site resources into it.
- Search for "S3" in the AWS console and click Create bucket.
- Give the bucket a human-readable name, choose
US Eastas the AWS Region, and disable the "block public access" option. - Click Upload and then Add folder. From the source repository, upload the
/sitefolder containing both the existing site'sindex.htmlandlogo.png, and a/betafolder containing the new site. Click "Upload" and, when the procedure completes, click "Close." - Select the
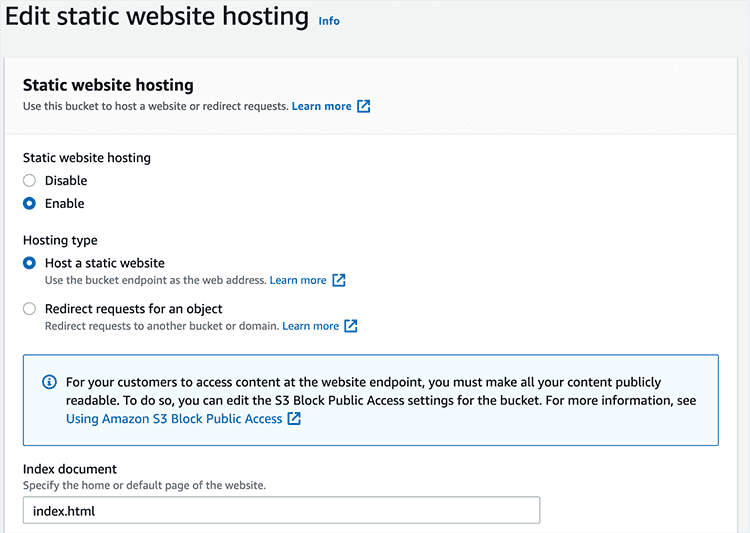
sitedirectory in your bucket. From the Actions menu, select "Make public," click to confirm and click Close. - Click on the "Properties" tab for the S3 bucket. Scroll all the way down to "Static website hosting." Click Edit and then choose "Enable." Specify
index.htmlas your index document and Save changes.
After you complete these steps successfully, click the bucket URL to view the page. Append /site at the end of the URL to load the page. Copy and save this URL, because you will need it later.
Manually set up the CloudFront distribution
Next, set up a CloudFront distribution. You will need this to deploy the function to Lambda@Edge.
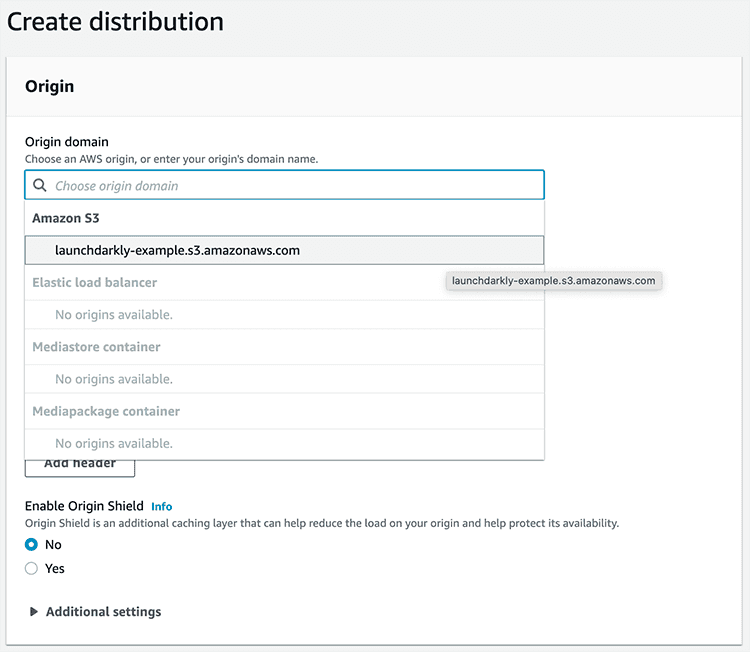
- In the AWS Console, search for "CloudFront" and click Create a CloudFront Distribution.
- For the "Origin domain," choose the S3 bucket we just created.
- Scroll down and click Create distribution.
Create a Lambda function connected to LaunchDarkly
Now you can create a Lambda function. You can use the AWS console to get started.
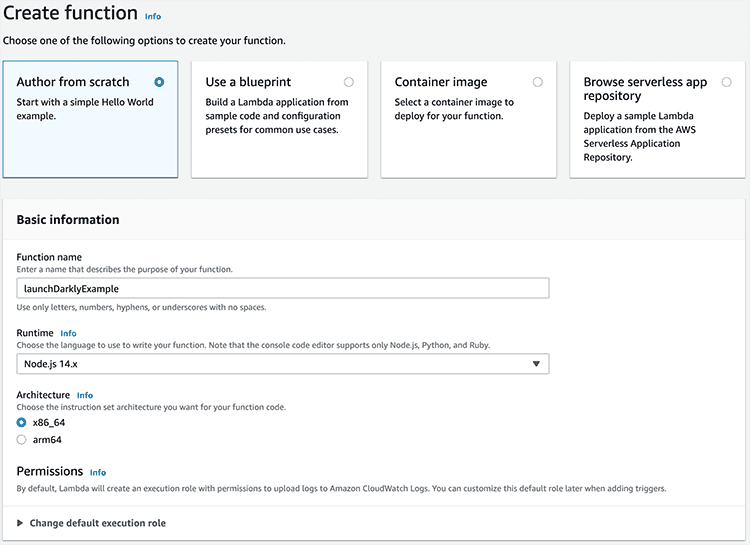
- In the AWS console, search for "Lambda."
- Click Create function.
- Choose "Author from Scratch." Name the function "launchDarklyExample" and choose the Node.js runtime, which is the default. You can also leave all the other options as the defaults. Click Create function.
The function you created doesn't do anything yet. In order to modify the code, let's move to VS Code. This will allow us to install our npm dependencies and upload the files back to Lambda.
- Create or open an empty project in VS Code.
- Click the AWS icon on the left. This is part of the AWS Toolkit for Visual Studio Code.
- Choose Lambda and find the "launchDarklyExample" you created.
- Right-click on the function and select "Download." When prompted, choose the current project folder.

Install and configure the LaunchDarkly SDK
After you download the function locally, install the LaunchDarkly Node.js (server-side) SDK.
-
Open the command line in the
launchDarklyExamplefolder that contains the Lambda function. -
Run
npm install @launchdarkly/node-server-sdk. -
Place the following code above the handler in
index.js. Replacesdk-key-123abcwith the SDK key from your LaunchDarkly environment. You can get this from Account settings in LaunchDarkly.Use this code:
const LaunchDarkly = require('@launchdarkly/node-server-sdk')const client = LaunchDarkly.init('sdk-key-123abc', { stream: true })The Node.js (server-side) SDK defaults to using streaming mode to receive flag updates. To use polling mode instead, set
{ stream: false }in the configuration options.We generally recommend using streaming mode, but the specifics depend on the use case for your Lambda:
- If your Lambda is invoked multiple times per minute or more, streaming mode is preferable because invocations are likely to reuse an existing streaming connection.
- If your Lambda's invocation volume often spikes to higher than usual levels, it is sensitive to execution context initialization time, and you are not using provisioned concurrency to minimize cold starts, consider using polling mode to receive flag updates. Polling mode may provide better initialization performance in this use case.
- If your Lambda is invoked infrequently, you can use either streaming or polling mode to receive flag updates.
To learn more, read
streamin the Node.js (server-side) SDK API documentation.Lambda@Edge does not support environment variables.Do not place the SDK key in an environment variable. Lambda@Edge does not support environment variables.
However, if you are integrating LaunchDarkly in a standard Lambda function, you should use an environment variable to keep your SDK key secure and out of your source code repository. You can do this from the AWS Console by going to your Lambda function and navigating to Configuration > Environment Variables.
-
Test your setup by initializing LaunchDarkly and returning a response indicating whether it has succeeded or failed.
exports.handler = async (event) => {let response = {statusCode: 200,};try {await client.waitForInitialization({timeout: 10});response.body = JSON.stringify("Initialization successful");} catch (err) {// timeout or initialization failureresponse.body = JSON.stringify("Initialization failed");}return response;}; -
To update the Lambda function, including uploading the npm dependencies, open the AWS panel in VS Code. Right-click the function and select "Upload." When prompted, choose "Directory" and then select the directory that the Lambda function is in. When it asks you whether to build with SAM, choose "No."
-
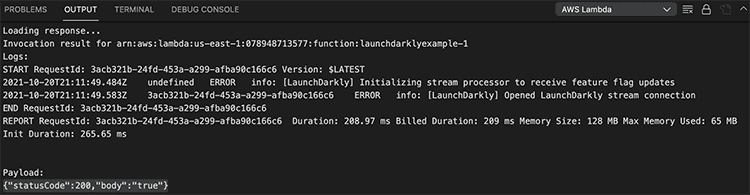
To test the function, right-click on the function again and choose "Invoke on AWS." We do not need to provide any payload, just click the "Invoke" button. The output panel should show a response
{"statusCode":200,"body":"\"Initialization successful\""}showing that the SDK client properly initialized.

Create a flag in LaunchDarkly
LaunchDarkly is now initialized, so you can set up flags to use in the function code.
To create a flag:
- Click Create, then choose Flag. The "Create new flag" page appears.
- Enter "Rebrand" for the Name.
- (Optional) Add a Description.
- (Optional) Update the Maintainer for the flag.
- Select the Release flag template. Keep the Boolean flag type and default flag variations.
- Uncheck the SDKs using Mobile key and SDKs using Client-side ID checkboxes.
- Click Create flag. The flag’s Targeting tab appears.
- Scroll to the "Default rule" section and click the pencil icon.
- Choose "A percentage rollout" from the Serve menu. For the purposes of this example, assign 50/50. In a real-world scenario, you'd likely start with a smaller distribution in the first variation and increase that number over time.
- Click Review and save.
- Toggle the flag On and save again. If you don't turn targeting on, the percentage rollout will not run and you'll only serve the default off variation.

Get a flag value in Lambda
Now that you've created a flag, you can use it in your function. First, you'll add a new flag call to the code. The code below uses the LaunchDarkly SDK to call for the value of the rebrand flag. Use your context key to identify the context. The key determines which variation you receive, based on rollout percentages. Because you're entering the key manually, you will always get the same result regardless of how many times you call the flag.
Replace the existing handler code with the code below:
exports.handler = async event => {let response = {statusCode: 200,}try {await client.waitForInitialization({timeout: 10});} catch (err) {// timeout or initialization failure}let viewBetaSite = await client.variation('rebrand', { key: 'your-context-key-123abc' }, false)response.body = JSON.stringify(viewBetaSite)return response}
Open the AWS panel in VSCode. Right-click to upload. When the upload finishes, right-click the function and invoke it again. You do not need a payload.
You should receive a response similar to {"statusCode":200,"body":"true"}.
You've successfully integrated and used a LaunchDarkly flag in a Lambda function. If you weren't deploying to Lambda@Edge, there would be no additional setup steps necessary. All you would need now would be to implement your code within the Lambda to respond to the value our flag returns.
Deploy your function to Lambda@Edge
You're using Lambda, and now you can add Lambda@Edge. Here's how to deploy your function there.
A function running on Lambda@Edge receives a specific event structure. You can use this to specify a key for LaunchDarkly that will ensure that different contexts get different flag variations, but the same context always ends up in the same group. For example, contexts 1 and 2 will each get variations A and B, respectively, regardless of how many times they load the website. Context 2 will never get variation A and context 1 will never get variation B.
The code below gets the value of the flag and, if the value is true, redirects them to the beta site. Otherwise, if the value is false, it redirects them to the original site. A more complete solution would take into account the URI and query string that was requested and redirect them to the appropriate location on either the beta or main site, but this example is simpler than a real-life example. The code below gets the value of the flag and, if the value is true, redirects them to the beta site.
First, update your function to use this event. You can use the context's IP address as the key. While the IP isn't unique to an individual, it is the only identifying information we always have available for the context.
Here is the event code:
exports.handler = async (event) => {let URL ="https://launchdarklydemostack1-s3bucketforwebsitecontent-jffmp2434grq.s3.amazonaws.com/site/";try {await client.waitForInitialization({timeout: 10});} catch (err) {// timeout or initialization failure}let viewBetaSite = await client.variation("rebrand",{ key: event.Records[0].cf.request.clientIp },false);console.log(`LaunchDarkly returned ${viewBetaSite}`);if (viewBetaSite) URL += "beta/index.html";else URL += "index.html";return {status: "302",statusDescription: "Found",headers: {location: [{key: "Location",value: URL,},],},};};
Use the AWS panel in VSCode to upload it again by right-clicking on the function and choosing "Upload Lambda."
Test your Lambda@Edge function
To test the function within the AWS panel, you must provide a payload that represents the Lambda@Edge event structure.
Open the AWS panel in VS Code. Right-click on the function and select "Invoke on AWS." From the sample request payload menu, choose the "Cloudfront HTTP Redirect" and then click "Invoke."
You should get a response like:
{"status":"302","statusDescription":"Found","headers":{"location":[{"key":"Location","value":"https://launchdarklydemostack1-s3bucketforwebsitecontent-jffmp2434grq.s3.amazonaws.com/site/beta/index.html"}]}}
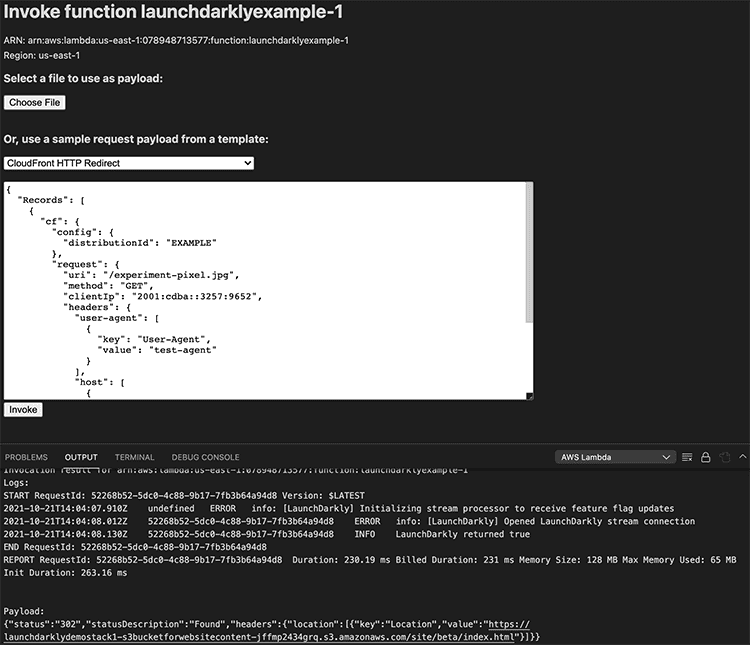
Try changing the IP address in the payload and clicking invoke again. In most cases, you'll get a different response, because our rollout is split 50/50. If you receive the original site variation again, you may need to change the IP more than once. Ultimately, the percentage percentage breakdown of sites that display will be 50/50, but that doesn't mean the value returned alternates between each request.
Connect a CloudFront trigger
Your function now uses the Lambda@Edge event data and returns the correct redirect response, but you need to trigger it from the CloudFront distribution you created earlier. To do this, add a CloudFront trigger.
First, you must update the execution role of the function. Here's how:
- In the AWS console, search for "Lambda" and select your function.
- Go to the Configuration tab for the Lambda function, click Permissions, then under Execution role click Edit.
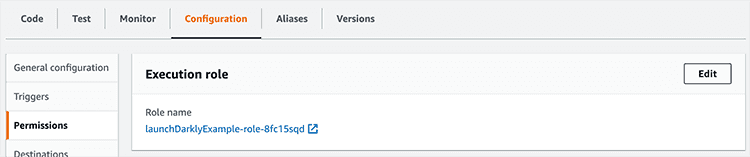
- In the "Existing Role" menu, select "service-role/lambdaEdge."
- Click Save.
Now you can enable the trigger. Here's how:
-
Open your Lambda Function and click Add trigger.
-
In the "Select a trigger" menu, search for "CloudFront" and then click the button to Deploy to Lambda@Edge.
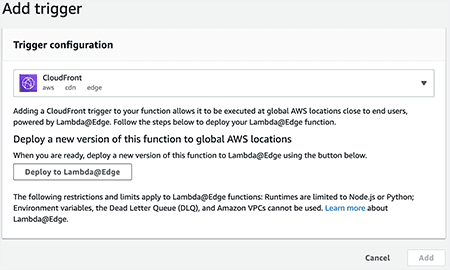
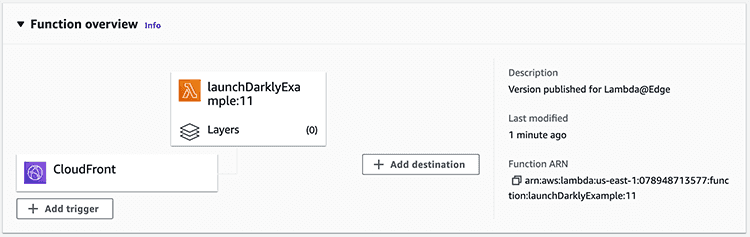
Adding a CloudFront trigger. -
When you configure the CloudFront trigger, change the CloudFront event to "Viewer request." This ensures that the Lambda will execute on every request before the cache is checked.
If you used the default, which is "Origin request," the cache would be checked first and flag changes after the initial run would pull from this cache. That means flag changes would not impact the redirect.
- Accept the defaults for the remaining properties and click "Deploy." You may get asked to do this a second time. If you are, choose "Viewer request" both times.
Finally, test to confirm this works. Here's how:
- Click the "CloudFront" box in the "Function Overview." The Configuration tab appears.
- Click Triggers settings.
- Click the link next to the CloudFront trigger that has your CloudFront distribution ID. The CloudFront distribution appears in a new tab.
- In the "Details" section of the CloudFront distribution tab, copy the URL for this distribution.
- If necessary, wait for the CloudFront distribution to finish deploying. If you paste this URL in the browser, it will direct you to either the old version of the page or the new one.
You can also change which site you receive, or test what the full rollout looks like, from LaunchDarkly. Here's how:
- Go to the Flags list and click into the "rebrand" flag.
- Change the "Default rule" from serving a percentage rollout to just serving
true. - Save the changes to your flag and go to the CloudFront domain again. You will be directed to the beta site.
That's it! You've successfully integrated LaunchDarkly into a Lambda function and then deployed that function to Lambda@Edge.
Use the Relay Proxy in AWS
While it is definitely not a requirement, there are some great use cases for LaunchDarkly's Relay Proxy, a number of which apply to working in a serverless environment like AWS.
Some of these use cases are:
- You need to reduce your app's outbound connections because you have thousands or tens of thousands of servers all connecting to LaunchDarkly and those connections are overwhelming your network. In a serverless context, this can potentially incur an increase in your overall costs.
- You want to keep end-user data private, so your SDKs evaluate against your Relay Proxy and your private data never leaves your network.
- You want to facilitate faster connections with SDKs that run more closely to your Relay Proxy. This can be extremely useful in serverless environments. In AWS, the Relay Proxy exists within the same environment as your Lambda, DynamoDB, or any other AWS resources your application uses.
- You want to increase startup speed in your serverless functions.
While the benefits are substantial, setting up the Relay Proxy can be somewhat intimidating as it's highly customizable, adapting to a variety of data caching options and logging levels.
To counter that intimidation, we're providing a completely serverless deployment that enables you to run the Relay Proxy in your AWS account. The setup script aims to be easy to read, easy to change to suit your needs, or to use as-is.
Using the AWS CDK, we create an ECS Fargate Cluster with sufficient compute and memory resources to serve whatever scale you need to meet for your proxy. Backing this cluster is a DynamoDB table with single digit millisecond latency, set to scale to your workload rather than provision a fixed capacity making it suitable for virtually any scale.
To create the AWS ECS Fargate Cluster, we use a higher order AWS CDK Construct, Application Load Balanced Fargate Service, which takes care of most of the heavy lifting in configuring ECS and allows for a variety of configuration options, although it's been specified to match the resource needs of the Relay Proxy Guidelines and uses the built in defaults of the Relay Proxy to simplify configuration.
The source code for this deployment is available on GitHub. The core of the project is the 89 lines of code that define the stack. The rest is configuration around the CDK and setting environment variables to define the region, SDK keys and whether you also want to serve client side SDKs. For example, if you want to use the Relay Proxy for retrieving flag data on the front-end of your application that is also deployed to AWS.
We created the "Relay Proxy deployed with the AWS CDK" function, but we did not extensively test and do not formally support it. For best results, test the procedure on accounts that do not contain business-critical data before you modify production environments.
Here are the steps to set this up:
-
Clone the GitHub repository, change directory into the project, and install the project dependencies:
git clone https://github.com/halex5000/launchdarkly-relay-proxy-aws-serverless-cdkcd launchdarkly-relay-proxy-aws-serverless-cdknpm install -
Copy the example environment file and then edit it with your own environment variables, including your LaunchDarkly SDK keys:
cp .env.example .env -
Install the AWS CLI if you don't already have it.
-
Set up your account and region to use the AWS CDK, making sure to replace the account number and region placeholders below with your own details:
npm run cdk bootstrap aws://{ACCOUNT-NUMBER}/{REGION} -
Finally, deploy the stack to AWS:
npm run cdk deploy
The deployment should take about two minutes to run and it will deploy to the account and region that you configured using the credentials from your CLI. During the process, you'll be prompted to approve new roles and permissions created by this stack.
If you prefer to use CloudFormation, you can easily convert this CDK project to a cloud formation template (CFT) with the following command after completing steps one and two above:
npm run cdk synth > cloud-formation-template.yaml
This will generate a CloudFormation template and save it locally in your machine.
Once the Relay Proxy is set up, it will automatically keep flag values in sync with the DynamoDB table that the configuration creates. This means that you can configure the LaunchDarkly SDK in your Lambda functions to use the DynamoDB table as a data store and run in daemon mode. As discussed in the prior section, daemon mode allows the SDK to retrieve values exclusively from the configured data store rather than calling LaunchDarkly. This can speed up the startup of the SDK client as well as allow for even faster flag evaluations.
Handle LaunchDarkly analytics events
LaunchDarkly's dashboard provides a lot of detail on flag usage, contexts, and Experimentation results. Much of this data is passed to LaunchDarkly using analytics events. To learn more, read Analytics events.
To save on performance and network requests, the LaunchDarkly SDKs buffer these events, sending them on a configurable interval.
One of the potential complications of running LaunchDarkly within Lambda, or in any serverless context, is that the Lambda may shut down before all pending analytics events have been sent. There are a couple of solutions for this: flushing events and closing the client.
Flush events
One solution is to manually flush analytics events on every invocation of the Lambda. It is just a one line addition to your handler code.
Here's how to flush events:
exports.handler = async (event) => {try {await client.waitForInitialization({timeout: 10});} catch (err) {// timeout or initialization failure}const apiVersion = await client.variation("flag-key-123abc", {key: "anonymous"}, "");// flush the analytics eventsawait client.flush();const response = {statusCode: 200,body: JSON.stringify("Hello world"),};return response;};
Try it in your SDK: Flushing events
While this works, it has also effectively eliminated the buffer entirely since all events will be flushed on every invocation, making a call to LaunchDarkly's servers in the process. This may not be the ideal solution for you, but there's another option.
Close the client
Before closing the client, flush any pending analytics events to LaunchDarkly. You can handle this using a Graceful shutdown with AWS Lambda. This requires that you add an extension to your Lambda. You can use the CloudWatch Lambda Insight extension as it is built in.
Here are the steps:
- Open your Lambda function, go to the Layers section at the bottom of the page, and choose "Add a layer."
- Leave the "AWS layers" option selected. In the dropdown, select "LambdaInsightsExtension" under the "AWS provided" heading, then click "Add."
After you add the extension, you can listen for the SIGTERM event that indicates that the Lambda is being shut down, and run code at that time.
Here's how:
const LaunchDarkly = require('@launchdarkly/node-server-sdk');const client = LaunchDarkly.init(process.env.LAUNCHDARKLY_SDK_KEY, { stream: true });exports.handler = async (event) => {let response = {statusCode: 200,};try {await client.waitForInitialization({timeout: 10});} catch (err) {// timeout or initialization failure}const flagValue = await client.variation("flag-key-123abc", { key: "anonymous" });response.body = JSON.stringify(flagValue);return response;};process.on('SIGTERM', async () => {console.info('[runtime] SIGTERM received');console.info('[runtime] cleaning up');// flush is required for the Node.js (server-side) SDKawait client.flush()client.close();console.info('LaunchDarkly connection closed');console.info('[runtime] exiting');process.exit(0)});
If you'd like to watch this process run, go to the "Monitor" tab in the AWS Lambda console and choose "View logs in CloudWatch." You can view the logs for a recent run of your function and see that you triggered the cleanup script. In our tests, this happened approximately six minutes after the last call of the function.
Cleanup
If you'd like to clean up your AWS environment when you complete this guide, here's how:
- Remove the CloudFront association by following the instructions in Amazon's documentation.
- Navigate to the Behaviors tab of your CloudFront distribution, edit the behavior and remove the Function association for Lambda@Edge. After the distribution deploys, we can delete the Lambda function.
- Empty the S3 bucket and delete it.
- Disable the CloudFront distribution. After disabling it, wait for it to finish deploying and delete the distribution.
Conclusion
In this guide, you integrated a LaunchDarkly flag into a Lambda function and deployed the function to Lambda@Edge. By doing this, you serve a flag variation closer to the end user's location, which means faster state changes to feature flags and no disruptions when the flag state changes.
Your 14-day trial begins as soon as you sign up. Get started in minutes using the in-app Quickstart. You'll discover how easy it is to release, monitor, and optimize your software.
Want to try it out? Start a trial.