Creating custom roles and policies
Read time: 5 minutes
Last edited: Jul 24, 2024
Overview
This topic explains how to create custom roles and policies in LaunchDarkly.
If you need to use custom roles to address a scenario not covered in the documentation, you can write your own policies with the advanced editor. To learn more, read Using the advanced editor. For examples, read Example policies and templates.
Create custom roles
Before you can give an account member custom permissions in LaunchDarkly, you must create a custom role to assign to them.
To create a custom role:
- Click the gear icon in the left sidenav to view Organization settings.
- Click Roles.
- Click Create role. The "Create custom role" panel appears.
- Enter a human-readable Name for the role.
- Enter a Key for the role.
- (Optional) Enter a Description to explain what the role does.
- (Optional) To create a role with no access to any resources, uncheck "By default, members can view all LaunchDarkly content."
- Create a policy in the "Policy" fields.
- Click Save role.
By default, LaunchDarkly allows you to create 1,000 custom roles per account. You can create more upon request, free of charge. To learn more, read How to right size when you are over LaunchDarkly system resource count limits.
You can also use the REST API: Create custom role
About starting roles
LaunchDarkly uses the built-in Reader role as the starting point for new custom roles when you create them. If you keep the By default, members can view all LaunchDarkly content box checked, the custom role starts with Reader permissions. You can use the role's policy to remove view permissions or allow the ability to modify resources.
You can also create custom roles with no access to any LaunchDarkly resources by unchecking the checkbox. To learn how, read Configuring roles with no access.

Create policies for custom roles
Policies are sets of actions a custom role is allowed or not allowed to take. You can create policies from the Roles page.
Advanced members can write custom policies of their own with the advanced editor. To open the advanced editor, click Advanced editor in the "Role policy" section.
The advanced editor is powerful. Before you use it, read Using the advanced editor.
To create a policy:
- Complete steps 1-7 in Create custom roles.
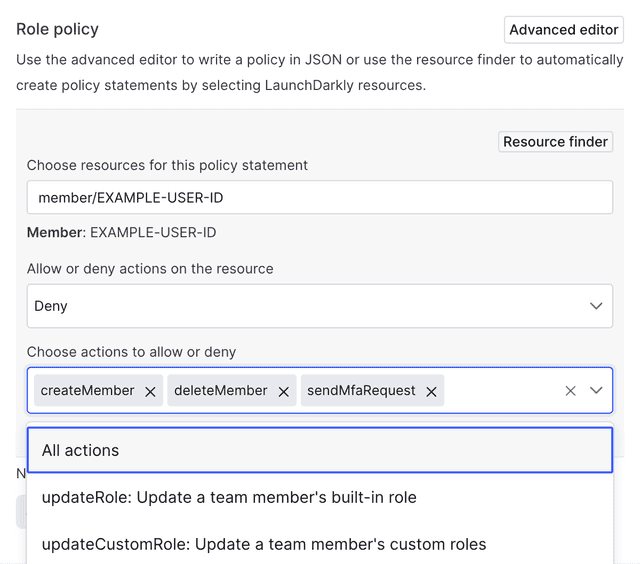
- In the "Create custom role" panel, click into the Choose resources for this policy statement field.
- Specify a resource this policy affects.
Many common LaunchDarkly items are resources, including flags, metrics, and more. If your LaunchDarkly project is large, it may be difficult to find the exact resource you need.
Click Resource finder to choose projects, feature flags, environments, metrics, and roles to add to your policy.
To learn more, read Find resource IDs.
- Under Allow or deny actions on the resource, choose an effect from the menu.
- Under Choose actions to allow or deny, choose one or more actions for the policy to enforce:

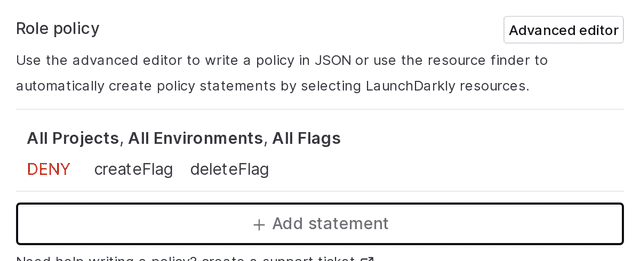
- Click Update. The results of your policy display:

Find resource IDs
You can find resource IDs with the resource finder, which you can access with the “resource finder” link in either the simple or advanced editor, or by using the keyboard shortcut ⌘ + . (Mac) or ctl + . (Windows). All of your environments, members, feature flags, metrics, and roles will be available.
To learn more, read Using the advanced editor.
View custom role details
You can view details about a specific custom role. More information is available on the "Role policy" panel.
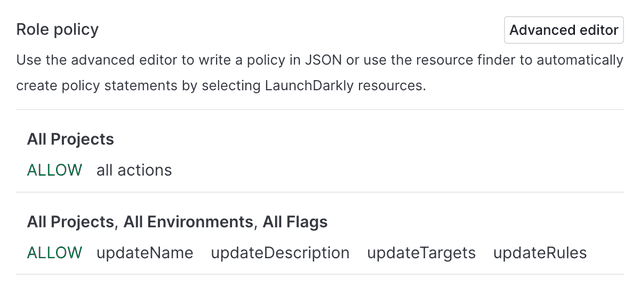
Use the "Role policy" panel to view detailed information about a custom role, including which projects and feature flags the role has permission to modify. You can also view each action the custom role can perform and what that action does.
Here is a screenshot of the "Role policy" panel:

To view details for custom roles from the Roles page:
- Click the gear icon in the left sidenav to view Organization settings.
- Click Roles.
- Find the role with details you wish to view and click Edit role. The "Edit custom role policy" panel appears.
You can also view details for custom roles from the Permissions tab for a given member:
- Navigate to the Members list.
- Click the name of a member.
- On the Permissions tab for the member, click the name of a custom role. The "Edit custom role policy" panel appears.

You can also use the REST API: Get custom role
Add, view, and remove an account member's roles
To learn how to add a role to an account member, read Adding member roles.
To learn how to view the roles for an individual account member, read Viewing member roles.
To learn how to remove a role from an account member, read Removing member roles.
You can also use the REST API: Get account member