Creating a release pipeline for your organization
Read time: 7 minutes
Last edited: Jul 09, 2024
Release pipelines is available to customers on an Enterprise plan. To learn more, read about our pricing. To upgrade your plan, contact Sales.
Overview
This guide describes how to create an example release pipeline, how to add flags to the pipeline, and what factors to consider when building a release pipeline for your own organization or project.
Release pipelines let you move flags through a series of phases, rolling out flags to selected environments and audiences following automated steps. You can use release pipelines to enforce a standardized process for your releases and ensure your releases are following best practices. To learn more, read Release pipelines.
Prerequisites
To use this guide, you need to:
- be using the multi-environment view in the LaunchDarkly user interface. To learn more, read the latest Release notes.
- be an Owner or Admin of your LaunchDarkly account, or have permissions as part of a custom role to create release pipelines.
- be an Enterprise customer or have release pipelines enabled for your account.
- be familiar with the release process for new features at your organization or within your team.
- be familiar with LaunchDarkly segments.
- be familiar with guarded rollouts.
Get started
JSON, string, and number flags cannot be added to a release pipeline.
The first time you set up a release pipeline in your LaunchDarkly project, use the opportunity to reinforce your existing best practices. You can align release pipeline phases with your current release process. For example, you could advance a flag that controls access to a new feature through "Development," "QA," "Beta release," and "Generally available" phases.
You should also consider how you will know a flag is ready to move between phases. What qualifies a flag to move out of the "QA" phase and into the "Beta release" phase?
Multiple release pipelines
You can create multiple release pipelines to separate releases for different groups, or to run simultaneous efforts in parallel. For example, if you have two release processes that are very different, you may want to create one release pipeline for each process.
If you want to set up more than one release pipeline, consider which parts of your organization's work are affected by the flags and environments moving through the release pipelines.
It may be helpful to standardize on the name and number of phases in your organization's release pipelines. Doing this will give a consistent view of the release processes as flags move between phases.
For example, all groups in your organization may use a "Beta testing" step in their release process, but some groups may have internal users complete the beta testing step, and other groups may have a small portion of customers complete the beta testing step.
Create a pipeline
This scenario imagines that you have three main environments: Development, QA, and Production. In this example, you are creating a pipeline with four phases:
- Development
- QA
- Beta release
- Generally available
This guide describes setting up each phase in its own section.
To begin, create the release pipeline:
- Navigate to Releases.
- If you have a release pipeline set up for your project, the default release pipeline appears. Click the release pipeline name, and select Manage release pipelines.

- Click Create release pipeline.
- Click into the title field and update the name to "Default release pipeline."
- Click Add description and add a short description like "The default release pipeline for our major releases."
- Proceed to the next section to begin setting up the pipeline phases.
Create the "Development" phase
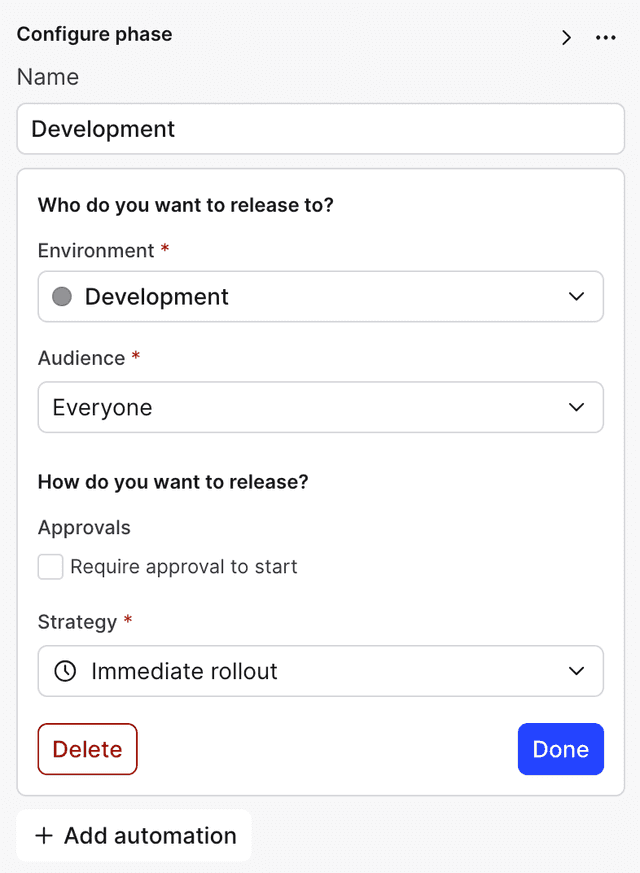
The initial "Development" phase is for an internal environment that only your developers have access to. This is the environment where the initial development work is done, and your feature may sit in this phase for several days or several weeks as it is being worked on.
In this example, you do not need to specify an audience, approvals, or rollout strategy for the Development phase, because this environment controls an internal-only developer environment.
To create the "Development" phase:
- The release pipeline automatically includes two phases: Testing and Production. Update the "Testing phase" Name to "Development."
- In the "Who do you want to release to?" section, choose the "Development" Environment.
- Leave the Audience set to "Everyone," and do not require Approvals or add a Strategy.
- Click Done.
Create a "QA testers" segment
Next, you want only a small subsection of your internal developers to be able to run QA testing on new features. To accomplish this, create a "QA testers" segment that includes only the QA testers and other developers that should have access to this feature.
This is what the targeting for your segment might look like:

To learn how to create a small list-based segment, read List-based segments.
Create the "QA" phase
To create the "QA" phase:
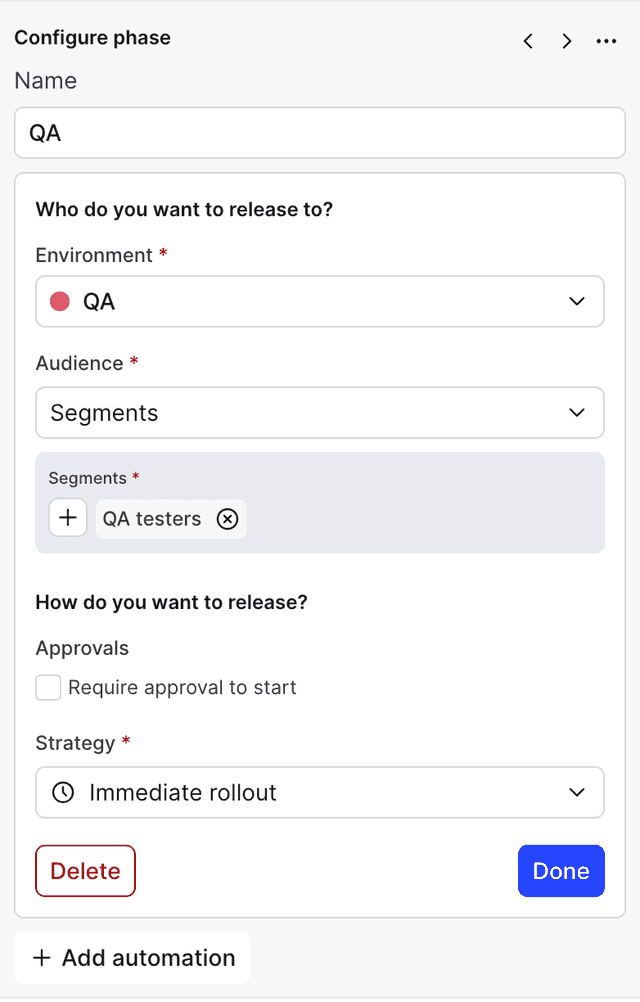
- Update the "Production" phase Name to "QA."
- In the "Who do you want to release to?" section, choose the "QA" Environment.
- In the "Audience" section, select Segments.
- Click the + icon and select "QA testers."
- Do not require Approvals or add a Strategy.
- Click Done.
Create a "Beta testers" segment
Next, you want only a small subsection of your customers to be able to beta test new features. These might be customers that you have a close working relationship with and who have agreed to be early adopters.
To accomplish this, create a "Beta testers" segment that includes only the customers that should have access to this feature during the beta testing period. You can add a beta-tester context attribute and then set the attribute value to yes for user contexts or organization contexts that are in the beta tester group.
This is what the targeting for your segment might look like:
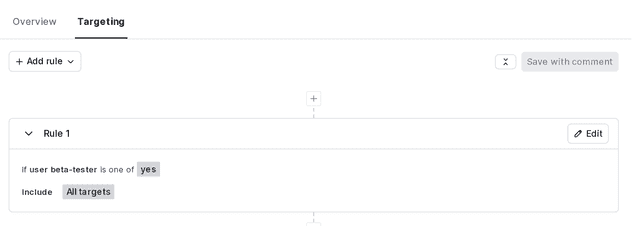
To learn how to create a rule-based segment, read Rule-based segments.
Create the "Beta release" phase
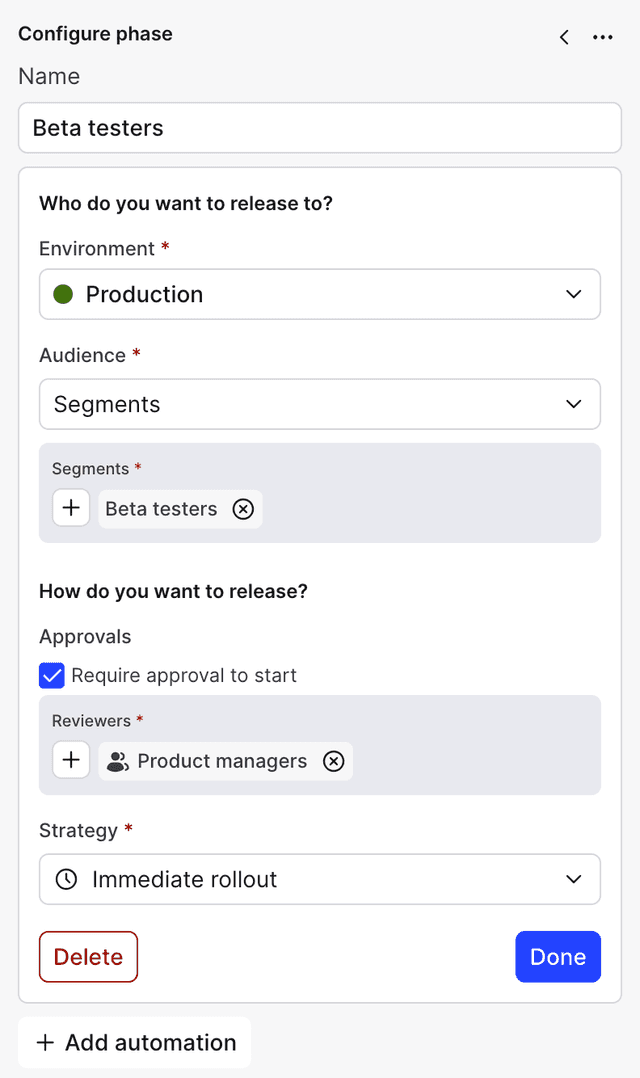
In this example, your rollout should be approved by someone from your product manager team. To learn how to create a "Product managers" team that you can use for approvals, read Creating a team.
To create the "Beta release" phase:
- Click the add phase + icon between the "QA" phase and the green "Released" phase:

- Enter "Beta release" for the phase Name.
- Click Add automation.
- Select the "Production" Environment.
- In the "Audience" section, select Segments.
- Click the + icon and select "Beta testers."
- Check Require approval to start.
- Click the + icon and select the "Product managers" team to approve rolling features out to your beta testers.
- Click Done.
Create the "Generally available" phase
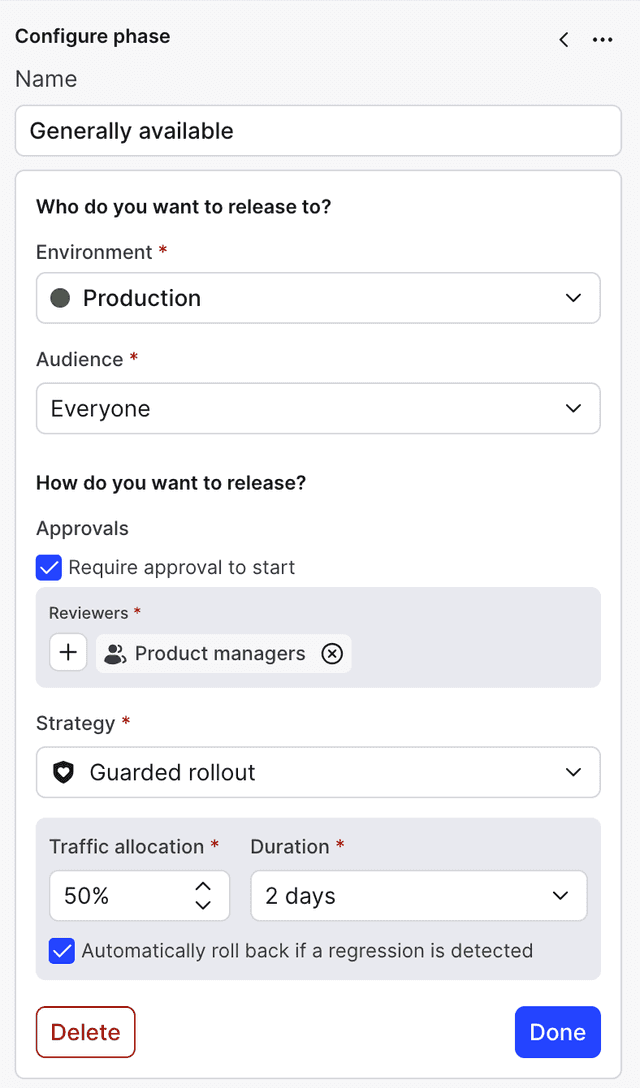
Finally, the last phase of your release plan is rolling out the feature to your full customer base. To ensure your new feature doesn't cause unexpected issues in your app, you will use a guarded rollout to detect any regressions and automatically roll back the release if issues are found.
To create the "Generally available" phase:
- Click the add phase + icon between the "Beta testers" phase and the green "Released" phase.
- Enter "Generally available" for the phase Name.
- Click Add automation.
- Select the "Production" Environment.
- Check Require approval to start.
- Click the + icon and select the "Product managers" team to approve rolling features out to your full customer base.
- Select the "Guarded rollout" Strategy. Keep the default Traffic allocation and Duration.
- Click Done:
- Click Create release pipeline.
Your release pipeline is now complete.
Add flags to your pipeline
To add a flag to a release pipeline:
- From the flags list, navigate to the boolean flag you want to add to your release pipeline.
- Click Start release in the right sidebar.

- If you have more than one pipeline, select the "Default release pipeline."
The release appears in the right sidebar.
Move flags through release pipeline phases
To begin moving a flag through the pipeline:
- From the flag's targeting page, find the phase you want to begin in the right sidebar.

- Click the start arrow for the phase. A "Start phase" dialog appears.
- Click Start.
LaunchDarkly executes the release phase immediately:
- If the phase includes an approval, starting the phase sends an approval request. If the approval request is approved, then LaunchDarkly completes the remaining steps in the phase.
- If the phase does not include an approval, the steps in the phase begin immediately, including updating any flag targeting, toggling the flag on, and beginning any guarded rollouts.
When the phase is complete, the next phase in the release pipeline is marked as "Ready to start." When you're ready for the flag to move through the next phase, click the start arrow for that phase.
After all the phases are complete for a flag, you can archive the flag. To learn more, read Archive flags.
Conclusion
In this guide, you learned best practices for implementing release pipelines across your organization, and how to think about flags as they move through the different phases of release pipelines.
Your 14-day trial begins as soon as you sign up. Get started in minutes using the in-app Quickstart. You'll discover how easy it is to release, monitor, and optimize your software.
Want to try it out? Start a trial.